
Taking a radiator off the wall is a bit more involved than you might first think. It’s not just about unhooking it; you've got to properly isolate it from the central heating system, drain every last drop of water, and then carefully disconnect the pipework. It's a job that needs to be done right to avoid a watery mess or, worse, damage to your heating.
What Moving a Radiator Actually Involves
Before you even think about picking up a spanner, remember this is a plumbing job, first and foremost. You're dealing with your home's pressurised central heating system, and one misstep could unleash a torrent of sludgy water across your floorboards or cause headaches for your boiler down the line.
Knowing what you're up against helps you prepare properly and honestly decide if it's a job you want to tackle yourself. You'll need a good dose of confidence, the right tools for the job, and a fair bit of patience.
Different Radiators Demand Different Approaches
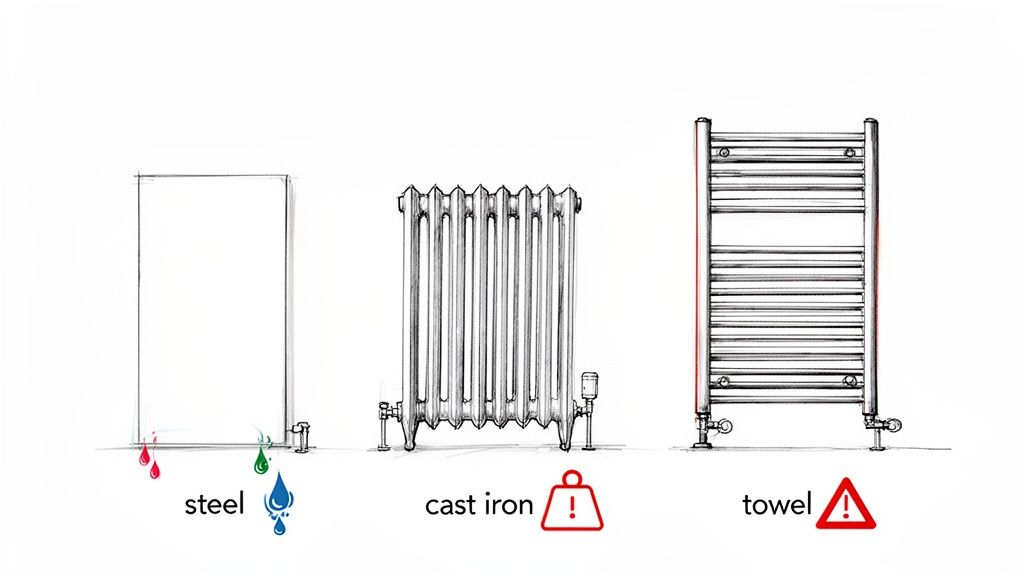
The type of radiator you’re dealing with makes a massive difference to the difficulty of the job. Most UK homes will have one of these three, and they each have their own quirks:
- Pressed Steel Panel Radiators: These are the ones you see everywhere. They’re relatively light and easy to manage, making them the best candidate for a confident DIY-er.
- Cast Iron Radiators: Common in older, period properties, and they are deceptively heavy. Even a small one can weigh over 50kg when empty. Moving one of these is strictly a two-person job, and you need to be extremely careful not to injure yourself or damage the floor.
- Towel Radiators: Usually found in bathrooms, these are nice and light, but their tall, skinny shape can make them awkward to get out of tight spaces without bumping into things.
The weight isn't just a concern for lifting, either. You have to think about how you’ll fix it to the wall in its new spot. Securing a heavy cast iron beast requires a completely different approach to a standard steel panel—it's a process that has more in common with learning how to hang a heavy mirror safely and securely.
Assessing the Reality of the Job
A successful radiator move is all about the prep work. It’s something people do all the time during renovations, and with 86% of households in England having gas-fired central heating, it's a common task. If you were to call in a pro, you’d be looking at an average cost of around £275, which gives you an idea of the skill involved. For a full breakdown, Checkatrade's guide is a great resource.
Key Takeaway: The biggest things that go wrong are water damage because the rad wasn't fully drained or a valve was leaky, and slow leaks after reconnection. My best advice? Have a mountain of old towels and a big bucket ready before you even touch a valve.
So, have a good think: are you comfortable shutting off valves, draining the system, and making plumbing connections? If the pipes need to be extended or re-routed to reach the new radiator position, the job quickly escalates. That's usually the point where making a call to a professional is the wisest move.
Getting Your Toolkit Ready
Before you even think about touching a spanner, let's talk about preparation. Trust me on this one: there’s nothing worse than being halfway through a job, with water dripping onto the floor, only to realise you’re missing a crucial tool. A quick trip to the DIY shop suddenly becomes a frantic, messy disaster.
Getting your gear in order first is the single best thing you can do for a smooth, stress-free radiator move. It’s not just about making the job easier; it’s about preventing damage. Trying to force a valve with the wrong size spanner is a classic rookie error, and a fast track to rounding off the nut and turning a simple task into a plumbing headache.
Your Radiator Moving Toolkit
To make it simple, I’ve put together a checklist of everything you'll need. Think of this as your mission-critical kit – don't start without it!
| Category | Item | Purpose |
|---|---|---|
| Hardware | Two Adjustable Spanners | Essential for counter-pressure. One grips the valve, the other turns the nut, preventing pipe damage. |
| Hardware | Radiator Bleed Key | For releasing trapped air and pressure before you start. A proper key is better than a screwdriver. |
| Hardware | Grips or Pliers | Handy for holding the lockshield cap steady while you adjust the valve inside. |
| Containment | Shallow Tray/Paint Tray | Slides neatly under the valves to catch the first drips as you loosen the connections. |
| Containment | Large Bucket | For emptying the tray and draining the main volume of water from the radiator. |
| Containment | Old Towels & Dust Sheets | You can never have too many. Protect your floors from that inevitable black sludge. |
| Reconnection | PTFE Tape | The key to a watertight seal. Wrapped around the threads before you reconnect. Don't skip this. |
| Reconnection | Central Heating Inhibitor | A chemical additive that prevents rust and sludge build-up inside your system. Absolutely vital. |
| Clean-Up | Old Rags or Kitchen Roll | For mopping up spills and wiping down connections before you apply fresh tape. |
Having this kit laid out and ready to go will make the entire process feel more controlled and professional. You can work methodically without any panicked interruptions.
The ‘Why’ Behind the Tools
So, why two spanners? It's all about preventing a twist. You’ll use one to brace the body of the valve, holding it absolutely still, while the other does the work of turning the connecting nut. This simple technique stops you from accidentally twisting and fracturing the delicate copper pipework hidden in your floor or wall. It’s a non-negotiable step.
And when it comes to the mess, be prepared. The water inside your heating system isn’t clean; it’s often a black, sludgy mix that can leave a permanent stain on carpets and wooden floors.
A Tip from Someone Who's Been There: Even when you think a radiator is empty, it isn't. As you lift it off the wall brackets, be ready to tilt it. A surprising amount of grimy water always collects in the bottom corners and will pour out if you’re not careful.
Finally, those reconnection supplies are your insurance against future problems. Using fresh PTFE tape on the threads is critical for a leak-free seal. A tiny, slow drip might not seem like a big deal, but over months it can cause serious, hidden damage to your floors and joists.
With your tools and supplies ready, you're set to tackle the disconnection with confidence.
A Practical Guide to Draining and Disconnecting
Right, let's get our hands dirty. Taking a radiator off the wall isn't complicated, but it is a step-by-step job. Getting the sequence right is the only way to avoid a very wet, very messy floor. We’ll walk through each part of the process, showing you exactly how to isolate, drain, and lift the radiator off its brackets without any drama.
First things first, shut down your central heating. Find your boiler and switch it off completely. The last thing you want is for it to kick in and start trying to pump hot water through the system while you're halfway through. Once it's off, give the radiators at least an hour to cool down. Trust me, the water inside can be seriously hot.
Shutting Off the Water Flow
Before you can drain anything, you need to cut the radiator off from the rest of the heating system. This just means closing the valves at both ends, which turns your radiator into a sealed unit full of water, ready to be emptied.
You'll have two valves to deal with. Start with the Thermostatic Radiator Valve (TRV) – that’s the big one with the numbers on it, usually from 0 to 5. Turn the dial clockwise as far as it will go, down to the 'off' or '0' setting. This shuts the valve inside and stops any more water from getting in.
Next, move to the lockshield valve at the other end. It’s usually hidden under a plastic cap. Gently pop the cap off (a flathead screwdriver works well) and you’ll see a small brass spindle. Use an adjustable spanner to turn this spindle clockwise until it stops.
A Pro Tip You Can't Skip: As you close the lockshield valve, count exactly how many turns it takes. Jot that number down somewhere safe. When you come to reinstall the radiator, you'll need to open it by the same number of turns to keep your heating system balanced.
Getting Ready to Drain
With both valves tightly shut, the radiator is isolated. But it's still full of water and trapped air. This is where your towels and bleed key come in.
Spread your dust sheets and old towels all over the floor under the radiator. The water that comes out is often black and full of sludge, and it will stain absolutely everything it touches. Put a shallow container, like a paint tray or a baking dish, directly under the valve you're going to loosen first. This is a critical part of learning how to move a radiator without causing chaos.
Keep a bigger bucket nearby so you can empty the tray as it fills up. It's a bit like other moving prep jobs, such as when you're removing a refrigerator—a little bit of planning saves a lot of hassle later on.
Releasing the Pressure and Draining
Now, grab your radiator key and open the bleed valve at the top. You should hear a hiss as the trapped air escapes. Releasing this pressure is what allows the water to drain out properly from the bottom.
With the air escaping, go back to the TRV. Use one adjustable spanner to grip the main body of the valve to hold it still. With your other spanner, slowly start to turn the large nut (the union) that connects the valve to the radiator. You only need to turn it anti-clockwise. As soon as you break the seal, water will begin to drip out.
The trick is to control the flow. Loosen the nut just enough for the water to trickle into your tray at a speed you can manage. When the tray is nearly full, just tighten the nut a little to pause the flow, empty the tray into your bucket, and then carry on. It can feel a bit slow, but rushing this part is never a good idea.
The Final Steps
Once the water stops flowing from the first valve, slide your tray over to the lockshield valve and do the exact same thing with its union nut. You can often get the last bits of water out by gently tilting the radiator towards the open end – this is usually where the nastiest, sludgiest water comes out.
The tools for this job are simple but absolutely essential, as this diagram shows.
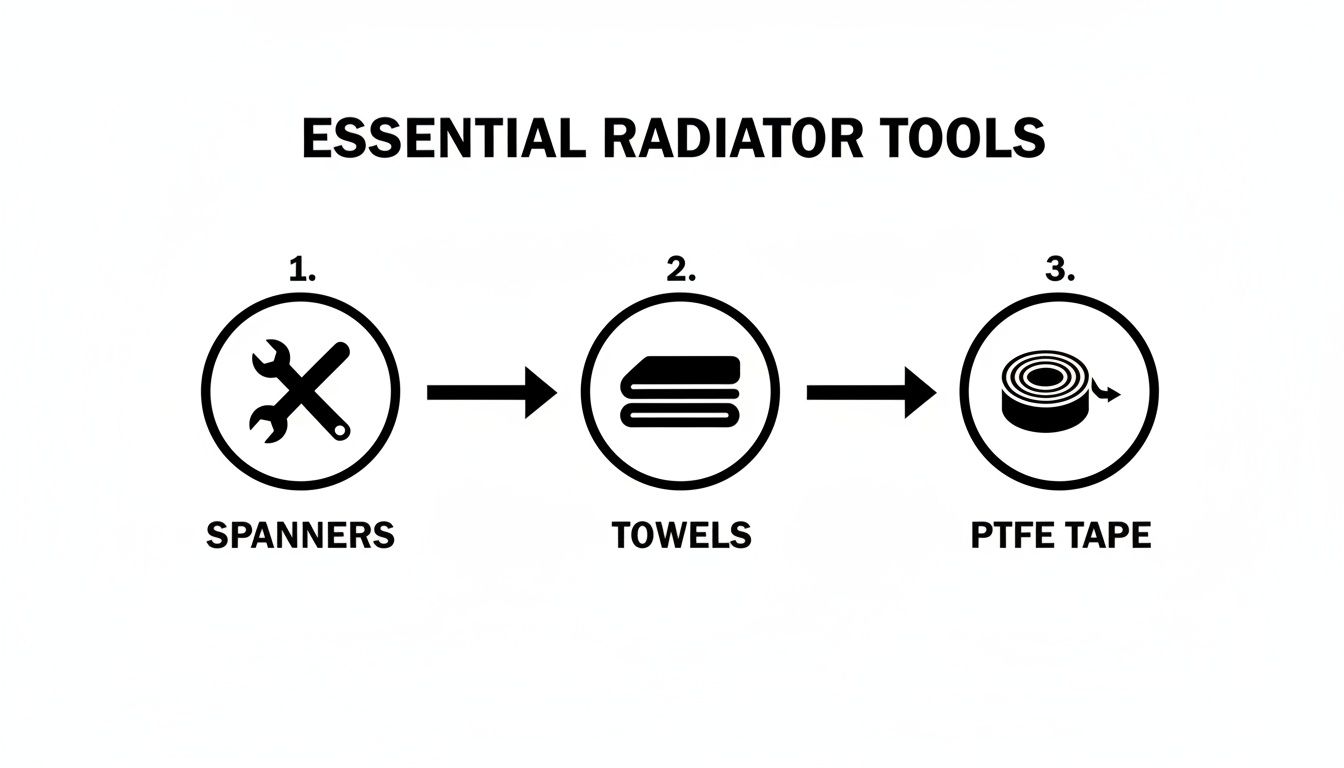
Seriously, don't even think about starting without good spanners, plenty of old towels, and a roll of PTFE tape for the re-installation.
Once you’re sure the radiator is empty, you can fully undo both union nuts. Be warned: even an 'empty' radiator seems to hold on to a surprising amount of water that will spill out the moment you lift it.
Finally, it’s time to lift it off the wall. It will be heavier than you think, so bend at the knees and lift with your back straight. Better yet, grab a friend to help you with this bit. Now it’s ready for the move! This careful process is especially important for the 52% of UK households whose heating systems are between 3-12 years old, as older components appreciate a bit of gentle handling.
Putting It All Back Together: Reinstalling and Firing Up Your Heating System
Alright, you've got the radiator off the wall and moved it without a hitch. But the job’s only half done. Getting it reinstalled and running leak-free requires just as much care. This is where you make or break a watertight seal and ensure your heating system runs smoothly.
The final stretch involves mounting the radiator securely, getting the pipework connected flawlessly, and then carefully bringing your central heating back to life. I’ve seen it countless times—people rush this part and end up with airlocks, cold spots, or that annoying gurgling sound for weeks. Let's do it right.
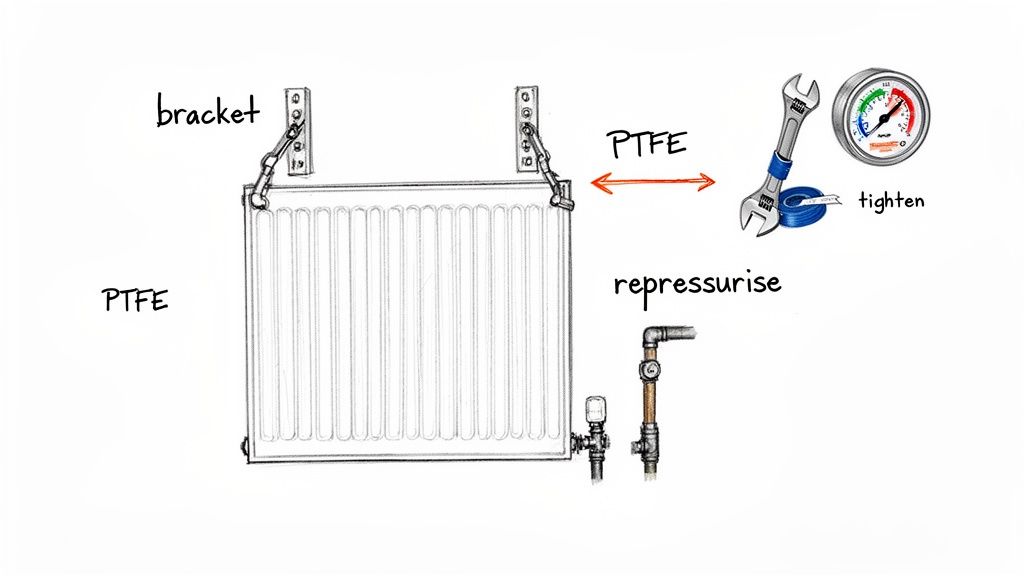
Getting the Brackets on the Wall
First things first, let's get those wall brackets fixed in its new home. They need to be perfectly level and strong enough to carry the radiator's weight, plus the extra heft of the water it will soon be holding.
Grab a spirit level and mark a perfectly horizontal line where you want the brackets. If you’re drilling into a solid brick wall, you'll need the right wall plugs and screws. For plasterboard, you absolutely must find the wooden studs behind the wall and fix directly into them. Don't even think about using standard plasterboard fixings; they simply won't hold.
- Measure Twice, Drill Once: I can't say this enough. Check and double-check that your marks line up perfectly with the mounting points on the back of the radiator.
- Think About the Pipes: The final height of your brackets determines how easily the radiator will connect to the pipework. A bit of planning here saves a lot of swearing and wrestling with pipes later on.
- Give Them a Tug: Once the brackets are up, give them a good, firm pull. Make sure they’re rock solid before you even think about hanging the radiator on them.
Reconnecting the Pipes for a Watertight Seal
With the radiator carefully hung on its new brackets, it's time to reconnect the valves. This is the moment of truth for preventing leaks.
Start by giving the male threads on the radiator adapter and the inside of the union nut a good clean. Any old bits of tape or grit will ruin your new seal. Now, grab your PTFE tape and wrap it clockwise around the male threads of the adapter. I find that 8-10 wraps is usually the sweet spot for a robust, watertight seal.
Carefully line up the union nut with the valve and tighten it by hand as far as it'll go. Then, it's time for the two-spanner trick: one to hold the valve steady and the other to turn the union nut. You want it firm and snug, but don’t go crazy. Overtightening can crack the nut or strip the threads.
A classic rookie mistake is wrapping the PTFE tape the wrong way. Always wrap it in the same direction you’ll be tightening the nut (clockwise). This stops the tape from unbunching and unravelling as you tighten everything up.
The Recommissioning Process Explained
Now for the big moment: bringing the system back online. The key here is to do it slowly and methodically to avoid trapping air in the system.
First, make sure the bleed valve at the top of the radiator is closed. Next, use your spanner to open the lockshield valve, turning it anti-clockwise by the exact same number of turns you noted down earlier. You should hear the satisfying gurgle of water starting to fill the empty radiator.
Now, slowly open the TRV. As the radiator fills, have your radiator key ready at the bleed valve. Once the gurgling sound stops, gently open the bleed valve until you hear a hiss of escaping air. Keep an old rag handy, because water will follow. The second you see a steady trickle of water, close the bleed valve tightly.
Having a basic grasp of how different parts of a heating system work, like hot water baseboard heaters, can give you a better feel for how water and air move through the pipework. It all helps build a more complete picture.
Repressurising the Boiler and Final Checks
The last job is to look at the pressure gauge on your boiler. It will have dropped significantly now that you’ve added an empty radiator back into the circuit. You'll need to find the boiler's filling loop (it’s usually a flexible silver hose) to top the pressure back up.
Most modern combi boilers like to sit between 1 and 1.5 bar when the system is cold, but it’s always wise to double-check your boiler's manual. Slowly open the valves on the filling loop and watch the needle on the pressure gauge climb into the correct zone, then close them off firmly.
With the pressure back to normal, you can switch the boiler on. As the system warms up, do one final, crucial check. Run your hand over every joint and connection you've touched, feeling for even the slightest hint of moisture. A tiny weep now can turn into a proper puddle later, so be thorough. And that’s it—your radiator is moved, reconnected, and ready to go.
When You Should Call a Professional Plumber
While this guide gives you the know-how for a straightforward radiator swap, the most important tool you have is knowing your own limits. Let's be honest, a DIY job that goes south can quickly turn from a simple task into a major, expensive headache. We're talking water damage, broken pipes, and a heating system that's completely out of action.
There are a few red flags that should immediately tell you it’s time to put down the spanners and pick up the phone.
The biggest one? When the job involves more than a simple like-for-like replacement. If your plan is to move a radiator to a brand new spot on a different wall, you've graduated from a simple swap to a significant plumbing job. This means extending or re-routing the existing copper pipework.
This is a whole different ball game. It involves cutting pipes, soldering new joints, and often lifting floorboards or chasing channels into walls. It’s a skilled job, and if you get it wrong, you can end up with serious leaks hidden behind walls or under floors—the kind you won’t find until a nasty damp patch appears on your ceiling.
Assessing Your System and Its Quirks
The age and state of your central heating system are also massive factors. If you’re in an older property with original cast iron radiators and valves that look like they belong in a museum, the risks shoot up.
- Seized or Fragile Valves: Older valves can get completely stuck with rust and limescale. Trying to force a seized valve is asking for trouble; they can easily shear off, leaving you with an unstoppable gush of water. A pro has the right tools and techniques to tackle these stubborn parts without causing a flood.
- Corroded Pipework: If the pipes look heavily rusted or have countless layers of old paint on them, they might be far more fragile than they look. The simple act of twisting a spanner could be all it takes to cause a fracture.
- Combination Boilers: Modern combi boilers are pretty sensitive to pressure changes and airlocks. If you aren't completely confident about recommissioning the system and repressurising the boiler correctly, a plumber will get it done to the manufacturer’s standards, keeping your warranty intact.
It’s also crucial to remember that if you live in a flat or apartment with a communal heating system, this is not a DIY job. Tampering with a shared system can knock out your neighbours' heating and hot water, and there are often strict building regulations to follow. In these situations, hiring a qualified engineer is mandatory.
When the task at hand seems daunting, remember that professional plumbing services are designed for these exact situations. They possess the specialised tools and deep expertise to handle complex jobs efficiently, turning a potential DIY crisis into a routine task.
The Cost-Benefit of a Professional
It's easy to get fixated on saving the cost of a plumber, but it’s much wiser to weigh that against the potential cost of a mistake. A small, slow leak from a poorly sealed joint can cause thousands of pounds in structural damage over time. Trust me, an emergency call-out fee to fix a flood you created will always cost more than hiring a professional from the start.
This is especially true for bigger projects. For instance, the thought process for moving a radiator is similar to relocating a boiler, where professional expertise is completely non-negotiable. If you're considering a larger job, looking into the factors that influence the cost to move a boiler can offer some really useful perspective on the value of professional work.
Ultimately, if you feel uncertain at any point, or the job looks even slightly more complicated than you first thought, that's your cue. The peace of mind and the guarantee of a safe, leak-free finish are well worth the professional's fee. It’s the smart choice that protects your home, and your wallet, in the long run.
Got Questions About Moving Your Radiators?
Even with the best guide in hand, you’re bound to have a few questions rattling around. It’s only natural. To clear up any lingering doubts, let's run through some of the most common things people ask when they're about to tackle moving a radiator. A few quick answers here can save you a lot of hassle later on.
Can I Really Move a Radiator Without Draining the Whole System?
Yes, you can—most of the time. That’s precisely what the valves at either end of your radiator are for. The Thermostatic Radiator Valve (TRV) and the lockshield valve are designed to let you completely isolate one radiator from the rest of your central heating circuit. Shut them both off correctly, and that radiator becomes its own little closed loop, ready for you to drain and remove without touching anything else.
But—and this is a big but—it all hinges on your valves being in good nick. If they're old or worn out, they might not seal properly. Even a tiny trickle of water getting past a faulty valve can turn a simple job into a slow, frustrating mess. That’s why you always, always have a stack of old towels ready to go.
A Pro Tip: Give your valves a quick test run before you start. Turn the heating on, then shut both the TRV and lockshield on the radiator you want to move. Wait a bit. If that radiator goes completely cold while the others are still toasty, your valves are doing their job perfectly. You're good to go.
Just How Heavy Is a Radiator, Anyway?
People always underestimate this. The weight varies massively depending on the type and size. Your average small, single-panel steel radiator might only be 10-15 kg when it's empty, which one person can usually handle. But a bigger, double-panel version can easily hit 30 kg or more.
And then you have the cast iron beasts. Even a small one can weigh over 50 kg, and the big ornate ones can push past 100 kg without even trying. This is non-negotiable two-person territory. Make sure it's fully drained, too, because any leftover water adds a surprising amount of weight. Trying to muscle one of these on your own is a classic recipe for a bad back or a damaged floor.
Do I Need to Add Inhibitor After I'm Done?
Absolutely. This isn't optional. When you drain the water out of your radiator, you're also losing some of the central heating inhibitor that’s protecting the whole system. Think of it as the lifeblood of your heating; it stops rust, sludge, and limescale from building up inside your pipes and boiler.
Forgetting to top it up is a false economy. It can lead to cold spots on your radiators, reduced efficiency, and eventually, a very expensive repair bill for something critical like your boiler's heat exchanger. Once your radiator is back on the wall and the system is refilled, you must add more inhibitor to get the concentration right. It’s a simple step that prevents some serious future headaches.
What if One of the Valves Is Stuck and Won't Budge?
First off, don't force it. Ever. Trying to brute-force a seized valve with a spanner is a fantastic way to snap the pipework and cause a major flood. If it just feels a bit stiff, you can try gently working it back and forth to see if it frees up.
But if it's properly stuck or won't seal completely, you've lost the ability to isolate that radiator safely. Your only real option now is to drain the entire central heating system, which is a much bigger job. If that sounds like more than you bargained for, this is the time to put the tools down and call a plumber. They’ve seen it all before and have the right gear to sort out a stubborn valve without turning your room into a swimming pool.
Whether you need a hand with bulky items like radiators during a move, require professional furniture assembly, or want a complete end-to-end relocation service, SimplyPro Removal & Storage Ltd has you covered. Our experienced handyman and removal teams make complex jobs simple and stress-free. Find out more about our comprehensive moving services in Bristol and Bath.