
Getting wallpaper paste off the wall properly is the one job that stands between you and a fresh coat of paint. It's often overlooked, but it's absolutely vital. For most modern, water-soluble pastes, a simple bucket of hot water mixed with a bit of washing-up liquid or white vinegar does the trick, letting you scrape it away with a flexible putty knife.
Why You Can't Skip Removing Old Wallpaper Paste
You’ve done the satisfying part – peeling off strips of that dated wallpaper. Now you're left with a slightly sticky, sometimes invisible, layer of old paste. It's so tempting to just paint right over it and call it a day, but trust me, that's a shortcut you'll regret.
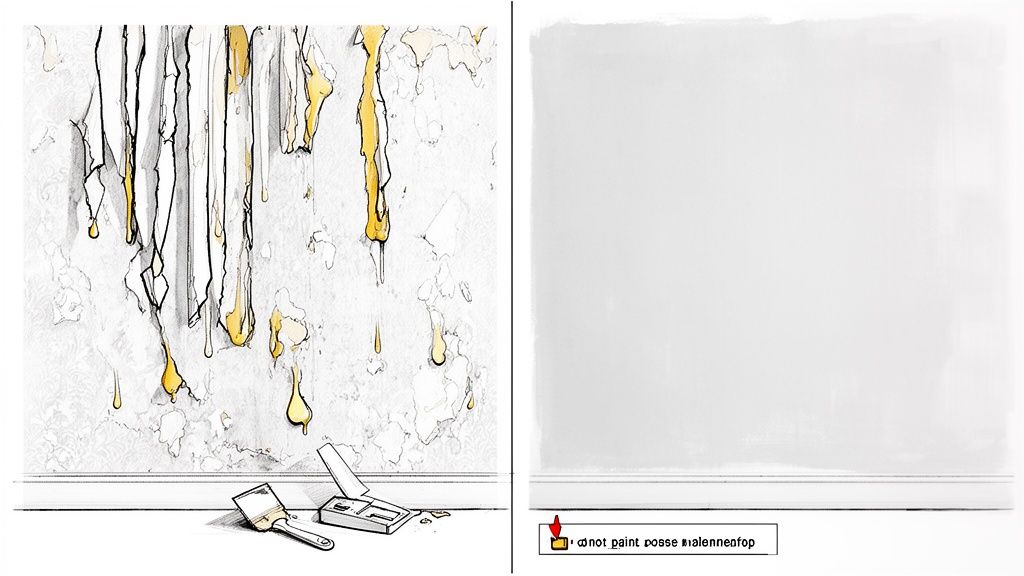
Painting over old adhesive is a recipe for disaster. The moisture from the new paint reactivates the paste underneath, which can cause your beautiful new finish to bubble, crack, or even peel away within months. It’s a classic DIY mistake.
Laying the Groundwork for a Perfect Finish
Think of your bare wall as a blank canvas. Any leftover paste creates a bumpy, unstable surface that stops new paint or wallpaper from sticking properly. Learning how to get wallpaper paste off isn't just about cleaning; it's about creating a solid foundation for whatever comes next. That flawlessly smooth wall is the secret to getting a professional-looking finish that actually lasts.
The UK wallpaper market hit a massive £85.1 million in 2023, but dealing with what's left behind remains a huge headache for DIYers. Traditional paper and vinyl wallpapers, which still make up over 36% of the market, are notorious for leaving stubborn paste behind. In fact, surveys show that poor removal techniques can lead to wall damage in up to 30% of projects.
Getting this right is crucial, especially if you're preparing a property for its next occupants. This is something we touch on in our ultimate end-of-tenancy cleaning checklist for 2025.
The single biggest mistake in any redecorating project is poor preparation. Taking the time to completely remove old wallpaper paste ensures your new paint or wallpaper adheres correctly and looks impeccable for years to come.
Choosing Your Wallpaper Paste Removal Method
To help you decide on the best approach, here’s a quick rundown of the common methods. Each has its pros and cons, depending on the type of paste you're up against and how much elbow grease you're willing to put in.
| Method | Best For | Effort Level | Key Tip |
|---|---|---|---|
| Water & Detergent | Newer, water-soluble pastes on painted plaster walls. | Low | Use hot water to speed up the process and a sponge to apply it generously. |
| Water & Vinegar | Stubborn water-soluble pastes. | Low to Medium | The acidity helps break down the adhesive. Use a 50/50 mix. |
| Wallpaper Steamer | Old, tough, or clay-based adhesives. | Medium | Don't hold the steamer in one spot for too long or you might damage the plaster. |
| Chemical Stripper | The most stubborn pastes, especially on delicate surfaces. | High (requires care) | Follow safety instructions to the letter and ensure good ventilation. |
Ultimately, the best method is the one that works for your specific situation. Don't be afraid to start with the gentlest option first and work your way up if you need more power.
Understanding Different Adhesives
Not all wallpaper pastes are the same, and the one on your wall will dictate your battle plan.
- Modern Water-Soluble Pastes: These are the friendliest kind, often used with newer wallpapers. A simple solution of warm water and a bit of detergent is usually all you need to dissolve them.
- Clay-Based Adhesives: If you're in an older UK home, you might be facing this stuff. It's much tougher, doesn’t dissolve easily, and often calls for a wallpaper steamer or a chemical stripper.
- Vinyl-Over-Vinyl Adhesives: Sometimes found where someone has wallpapered over old paper, this can be a real pain. You have to peel off the top vinyl layer before you can even think about tackling the paste underneath.
Figuring out what kind of residue you're dealing with is your first proper step. A quick test with a wet sponge will tell you a lot—if the paste gets gummy, it's likely water-soluble. If not, you’re in for a bigger job.
Getting Your Wallpaper Removal Kit Together
Honestly, a smooth wallpaper removal job is won or lost before you even get the walls wet. Getting all your gear sorted first saves you from those mad dashes to the DIY shop mid-job and keeps your stress levels down. Think of it as your prep work – the better you prepare, the cleaner and more efficient the whole process will be.
First things first, protect your room. This isn't just about being tidy; it's about preventing water damage and saving yourself a world of pain when it's time to clean up. Lay down some thick, absorbent dust sheets or plastic drop cloths right across the floor. I always use painter's tape to secure the edges to the skirting boards, creating a seal so no drips can sneak underneath.
You’ll also want to cover any furniture nearby. And, most importantly, deal with the electrics. Use painter's tape to completely seal over light switches and plug sockets. Water and electricity are a seriously bad combination, so this is a step you absolutely cannot skip.
The Essential Tools for the Job
With the room prepped, it's time to gather the tools that will do the heavy lifting. You don't need a huge, expensive kit, but having these key items will make a world of difference.
- Scraping Tools: I always recommend a flexible plastic putty knife instead of a stiff metal one. It’s much less likely to dig into the plaster and cause damage, especially when you’re putting a bit of force into a stubborn patch. A wider blade, maybe 3-4 inches, helps you cover more ground faster.
- Wallpaper Scoring Tool: This little gadget is a lifesaver if you're up against painted-over wallpaper or a tough vinyl. Its tiny wheels punch small holes in the surface, which lets your removal solution get through to the paste hiding underneath.
- Sponges and Buckets: Grab two buckets. You'll need one for your hot water mix and another for clean rinsing water. A couple of big, absorbent decorator's sponges are perfect for getting the solution onto the walls without it all running down your arm.
Mixing Your Solution and Staying Safe
The right liquid is your best friend when it comes to dissolving old paste. For most situations, a simple homemade mix does the trick beautifully.
Just combine hot water with a generous squirt of washing-up liquid, or mix it 50/50 with white vinegar. The heat gets to work softening the paste, while the soap or vinegar helps break it down chemically. If you're facing a really stubborn wall, a commercial wallpaper stripper might give you that extra bit of oomph.
Don't forget about your own safety. Always wear protective gloves to stop your skin from getting irritated by the water or any chemicals. Goggles are also a must-have to protect your eyes from drips and flying bits of gunk.
The demand for good removal gear is huge, tied to a massive £4.4bn floor and wall coverings sector in the UK. In places like Bristol and Bath, where professionals might handle hundreds of house moves a month, around 65% of clients are dealing with stubborn paste left over from the 80s and 90s. This has really pushed the demand for effective tools like steamers. Having the right kit doesn't just make the job easier; it can cut your project time down significantly. You can discover more about the evolving UK wallpaper market and its trends for some interesting insights.
Finally, keep plenty of old towels or rags handy to mop up spills as you work. A clean-as-you-go approach makes the final clear-up so much faster. It's also a good idea to have a strong bin bag nearby for all the soggy, stripped paper. With your toolkit ready, you can get started with confidence.
Practical Removal Methods from Simple Soaking to Steam
Once your room is prepped and your tools are lined up, it's time to get that old paste off the walls. There isn't a single magic bullet for this job; the best approach really depends on the age and type of adhesive you're up against. We'll walk through the main techniques, starting with the simplest and working our way up to the heavy-duty options for when the paste puts up a real fight.
Knowing which tools to grab is half the battle, and this quick decision tree should help.
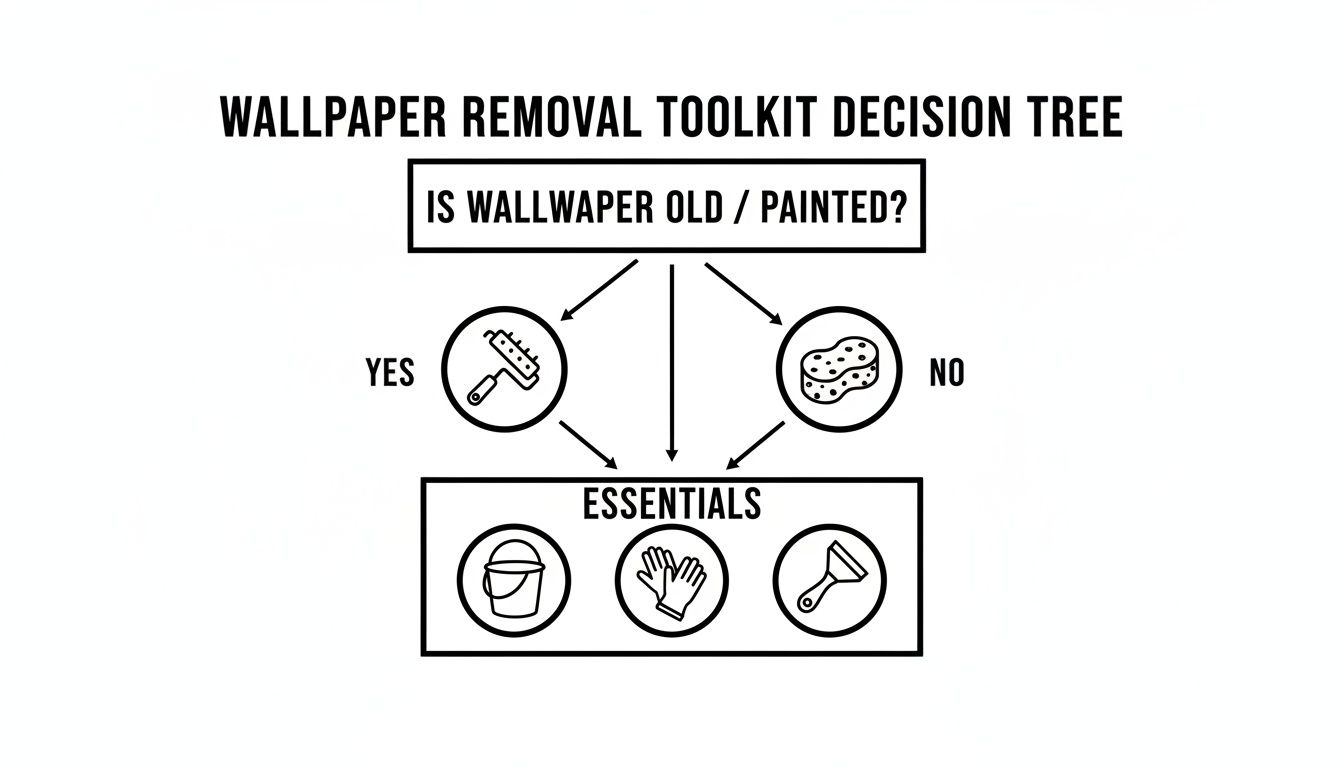
As you can see, it helps you quickly figure out if you need a scoring tool for old, painted-over paper, or if you can jump straight in with a sponge for more straightforward jobs.
The Gentle Approach with Water and Vinegar
It’s always best to start with the least aggressive method first. You might be surprised to find that for many modern, water-soluble pastes, all you need is hot water and a bit of patience. This approach is cheap, safe, and works a treat on adhesive that hasn't been on the wall for decades.
Your go-to solution is a simple mixture in a bucket: hot water combined with a good squirt of washing-up liquid. The heat helps to soften the paste, while the soap gets to work breaking down its stickiness. An even better alternative, in my experience, is a 50/50 mix of hot water and white vinegar. The mild acidity in the vinegar is fantastic for dissolving the stubborn starches found in some older pastes.
Using a large decorator's sponge, apply the solution generously to a manageable section of the wall—about one square metre at a time. Don't be shy with it; the key is to thoroughly saturate the paste. You’ll know it’s working when the residue starts to feel slimy or gelatinous. Let it soak for 5-10 minutes before you even think about scraping.
A Little Tip from Experience: Always work from the top of the wall downwards. This lets any drips run over areas you haven't tackled yet, effectively pre-soaking them for you. It’s a small thing that makes the job that much easier as you go.
After a good soak, use a flexible plastic scraper or a putty knife to gently lift the softened paste off the wall. Keep the scraper at a low angle to avoid digging into the plaster. If you hit a stubborn patch, don't force it. Just re-apply your solution and give it a few more minutes to work its magic.
Stepping It Up with Commercial Wallpaper Removers
Sometimes, a homemade solution just won't cut it, especially with ancient pastes that have practically fossilised over the years. This is where commercial wallpaper paste removers come in. These products contain enzymes and wetting agents specifically designed to break down stubborn adhesives far more efficiently than water alone.
When you're choosing a commercial remover, I'd recommend looking for a gel-based formula. Gels cling to vertical surfaces much better than watery liquids, which means they stay on the paste longer and give the active ingredients more time to do their job.
Follow the manufacturer's instructions to the letter, as dilution ratios and application methods can vary. Typically, the process looks like this:
- Mix the concentrated solution with the right amount of warm water in a bucket.
- Apply it to the wall using a sponge, roller, or even a garden sprayer for larger areas.
- Give the product time to penetrate—usually around 15-20 minutes.
- Scrape away the dissolved paste, then rinse the wall thoroughly with a sponge and clean water to get rid of any chemical residue.
Always make sure the room is well-ventilated by opening windows and doors when you're working with these products. While most modern formulas are pretty low-odour, good airflow is always a sensible precaution.
Bringing Out the Big Guns: A Wallpaper Steamer
For the toughest jobs—we're talking multiple layers of paper, old clay-based adhesives, or paste on unprimed walls—a wallpaper steamer is your best friend. A steamer uses hot vapour to penetrate and dissolve paste incredibly quickly, saving you a huge amount of time and elbow grease.
A wallpaper steamer is a simple bit of kit: a water tank that heats up, a long hose, and a steam plate. You just hold the steam plate against the wall, and the hot steam does all the hard work for you.
To use a steamer safely and effectively, keep these points in mind:
- Don't Overdo It: Hold the plate against a section for about 20-30 seconds. Any longer and you risk saturating the plasterboard, which can cause damage.
- Work Methodically: Steam one small area while you scrape the section you just steamed. This creates a good rhythm and stops the dissolved paste from drying out and sticking back to the wall.
- Manage the Drips: Steam produces a lot of condensation. Keep old towels at the base of the wall to catch the water and protect your floors and skirting boards.
A steamer is particularly brilliant in older UK homes, where you can find decades-old paste that feels more like concrete. The intense heat and moisture combo is often the only thing that can break down these formidable adhesives without hours of fruitless scraping. Once a section is scraped clean, give it a final wipe with a damp cloth to remove any last traces of residue before moving on.
Dealing with Problem Walls and Stubborn Paste
Even the most straightforward wallpaper removal job can throw you a curveball. One minute you're scraping away softened paste with ease, the next you've hit a patch that’s fused to the wall. Or worse, you uncover a nasty surprise lurking underneath. This is where a bit of patience and know-how can save you from a DIY disaster.
More often than not, the culprit behind stubborn wallpaper is an unprimed wall. If the original decorator slapped the wallpaper straight onto bare plasterboard, the paste has likely bonded directly with the paper surface of the wall itself. This creates a nightmare scenario where it's almost impossible to separate the two without causing damage.
When you find yourself in this situation, your best tool is time. Aggressive scraping is your enemy here; you’ll just end up gouging the wall. Instead, focus on letting your solution do the work. Re-wet the area with your hot water mix or remover, wait, and then re-wet it again. A steamer can be a lifesaver, but be careful not to hold it in one spot for too long, as you risk oversaturating and damaging the plasterboard underneath.
How Your Wall Type Changes the Game
The type and condition of your wall completely dictates your strategy. An approach that works perfectly on a modern plastered wall could be a disaster on an old lath and plaster surface. You have to adapt.
-
Unprimed Plasterboard: This is the big one. The wallpaper paste essentially becomes part of the wall's paper facing. You have to be incredibly gentle. The key is minimal scraping and accepting that you'll have more clean-up and sanding to do later to get a smooth finish for priming.
-
Old Lath and Plaster Walls: These walls are often brittle and can't take much punishment. Too much water or vigorous scraping can easily cause the plaster to crack or even pull away from the wooden laths. My advice? Use less water, work in small, manageable sections, and use the lightest touch possible with your scraper.
-
Painted-Over Paste: If a previous owner just painted over the old adhesive, you've got a real fight on your hands. The paint creates a waterproof barrier, stopping your solution from getting to the paste. You absolutely must use a scoring tool here to punch tiny holes through the paint, giving your remover a path to the adhesive underneath.
A classic mistake is trying to brute-force a stubborn patch of paste with a metal scraper. This almost always ends with you gouging the plaster. If a section won’t lift after a good soak, just re-wet it and give it another ten minutes. Patience prevents repairs.
When You Uncover Hidden Problems
Sometimes, removing the wallpaper reveals problems that have been hiding for years. Don't panic; most of these are fixable.
Finding minor cracks or small holes is common and easy to sort out once the wall is clean and dry. A bit of good-quality filler, a quick sand, and you're good to go. However, if you uncover large, deep cracks, signs of damp, or plaster that feels soft and crumbly to the touch, it's time to stop.
These are often signs of bigger issues—structural movement or a water leak—that need a professional eye. Just covering them up will mean your new paint or wallpaper will fail in no time. If the repairs look complicated or the whole job just feels a bit too much, getting an expert in is a smart move. For instance, reliable handyman services in Bristol can get the wall properly sorted, saving you a lot of time and future headaches.
Remember, the goal isn't just to get the old stuff off. It's to do it properly, preserving the wall so it's a perfect canvas for whatever you have planned next.
Getting Your Walls Ready for a Flawless New Look
Right, the sticky, stubborn wallpaper paste is finally off the walls. It’s a huge relief, I know, but don't even think about reaching for that paint roller just yet. What you do next is the difference between a job that looks DIY and a professional, long-lasting finish. This final prep work is everything.
Getting the paper and paste off is only half the battle. Even when a wall looks and feels clean, tiny, invisible bits of paste residue can cling on. From my experience, this is the number one culprit behind paint failing—it's what causes those frustrating bubbles, blisters, and peeling patches later on. We need to get rid of every last trace.
The All-Important Final Wash Down
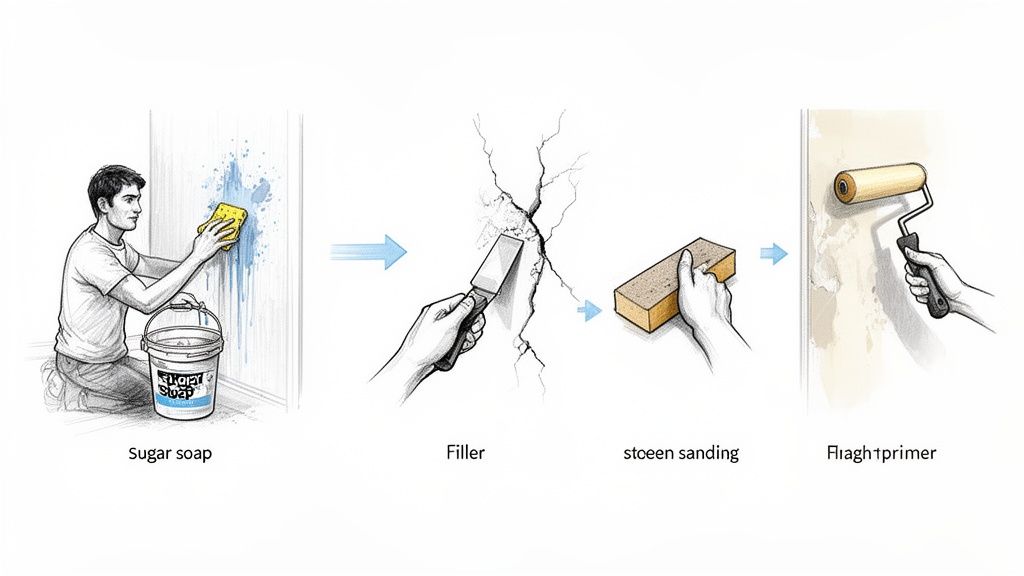
First things first, give the walls a proper wash with a sugar soap solution. It's a classic for a reason. This stuff is brilliant at cutting through any greasy or sticky film that plain water just won't touch. Mix it up with warm water, following the instructions on the packet.
Using a clean sponge, wash the walls from the top down. You're not trying to soak the plaster, just a good, firm wipe-down is all it takes. Once you've washed a section, grab a separate sponge and clean water to rinse the sugar soap off straight away. And a pro tip: keep changing your rinse water. If it gets cloudy, you're just spreading the residue around again.
This final cleaning step is non-negotiable. It removes the last traces of adhesive and ensures your primer and paint have a perfectly clean, stable surface to bond to. Skipping it is a gamble you don't want to take.
Finding and Fixing Every Flaw
Once the wall is bone dry, it’s time to play detective. Run your hand over the entire surface; you’ll be surprised what you can feel, from tiny bumps to rough patches. For a really thorough check, grab a bright torch and hold it close to the wall at a sharp angle. This technique, known as 'raking light', will cast shadows and reveal every tiny imperfection you'd otherwise miss.
You'll likely find a few common issues:
- Small nail holes from old pictures and shelves.
- Minor cracks that were hiding under the old wallpaper.
- Small gouges or dents you might have accidentally made while scraping.
For these little repairs, a decent quality, ready-mixed filler is your best friend. Use a flexible filling knife to push the filler right into the hole or crack. Overfill it slightly, as it will shrink a little as it dries. Once it’s completely hard, grab a sanding block with around 120-grit sandpaper and sand the filled patch until it's perfectly flush with the wall.
This sort of attention to detail really pays dividends. Properly preparing a wall is a foundational skill, whether you're about to paint or figuring out how to hang a heavy mirror securely.
Priming: The Final, Crucial Step
With your walls now clean, repaired, and perfectly smooth, there's just one vital job left before you can decorate: priming. A quality primer is essential because it seals the porous surface of the plaster and filler, creating a uniform base for your paint. It stops the new paint from just soaking into the patches, which is what causes a blotchy, uneven finish.
A good primer also helps to block any faint, lingering stains and gives your topcoat something to really grip onto. For a wall that's just been stripped, a stain-blocking primer is almost always the best choice. It creates a solid barrier that guarantees nothing from the old wall will bleed through and ruin your new paint job.
Old wallpaper paste can be a surprisingly stubborn residue. It's always useful to learn how to deal with different types of persistent marks. For perspective on another tricky cleanup job, you might find this article on Removing Pet Stains from Wood Floors interesting.
Roll on one even coat of primer across the entire wall and let it dry completely. Now, and only now, are your walls truly ready for their transformation. All this careful prep work ensures your fresh paint or new wallpaper will look fantastic and stay that way for years to come.
Got a Few Questions About Getting Rid of Wallpaper Paste?
Once you’ve wrestled the paper off the walls, you’re often left with the less glamorous job of dealing with the paste. It’s the part of the project where a few nagging questions can pop up. To help you get this sorted properly, I’ve pulled together answers to the most common queries I come across.
Is It Really That Bad to Just Paint Over the Paste?
This is the question I hear more than any other, and my answer is always a hard "no". Don't do it. Painting directly over old wallpaper paste is a recipe for disaster. The moisture from the new paint will reactivate the old glue, leading to bubbling, cracking, and peeling. You’ll end up with a finish that looks awful and is a nightmare to fix later.
Even if it looks okay for a week or two, the paint will almost certainly fail down the line. The paste creates a weak, unstable layer that stops the paint from getting a proper grip on the wall itself. Trust me, taking the extra time to get every last bit of that paste off is non-negotiable for a professional, long-lasting finish.
Painting over paste is the classic DIY shortcut that ends in regret. You'll likely face a peeling, bubbling mess within months, forcing you to strip everything off and start from scratch. It’s just not worth the gamble.
How Can I Be Sure All the Wallpaper Paste Is Actually Gone?
This is a great question, because sometimes it’s hard to tell. The key is to check when the wall is completely dry after its final rinse. Run your hand over the surface – it should feel consistently smooth everywhere, with no sticky, slimy, or slick spots.
Here's a little trick I use: take a dark-coloured, damp cloth and wipe it over a small section of the wall. If it comes away with any kind of sticky or slimy gunk on it, you’ve still got work to do. Another dead giveaway is seeing shiny or patchy areas when you look at the wall from an angle in good light. Those shiny patches are almost always leftover adhesive that needs another wash.
What’s the Absolute Fastest Way to Remove Wallpaper Paste?
When you just want the job done, you need the most efficient tool for the task. For any large area or walls with stubborn, old paste, a wallpaper steamer is hands-down the fastest method. The steam works its way into the adhesive, dissolving it far quicker than any water-based solution, which means you can scrape it off with much less elbow grease.
Yes, you have to buy or hire the machine, but the time and effort it saves, especially on walls with multiple layers of ancient paste, is huge. That said, if you’re just dealing with a small patch of modern, water-soluble paste, a bucket of hot water with a splash of vinegar can be just as quick and a lot less fuss.
When Should I Give Up and Call in a Professional?
Knowing when to throw in the towel and call an expert is a skill in itself. It’s time to pick up the phone if you uncover any serious wall damage hiding under the paper – things like deep structural cracks, crumbling plaster, or any signs of damp. These are bigger problems that need a specialist.
Likewise, if you’re working with a delicate or historic surface, like old lath and plaster, a professional will have the experience to remove the paste without wrecking the wall. And finally, if you've tried everything and the paste just isn't shifting, or if the sheer size of the job feels completely overwhelming, a pro can get it done quickly and correctly, saving you a massive amount of time and stress.
Feeling like the job is bigger than you anticipated? Whether you're preparing for a move or just redecorating, SimplyPro Removal & Storage Ltd offers handyman and clearance services to get your walls prepped perfectly. Contact us today for a fast, no-obligation quote.