
A loft storage conversion is one of the most practical home improvements you can make. It’s not about adding a new bedroom; it’s about turning that dusty, unused attic into a safe, clean, and easily accessible space to store all the things you don't use every day. Think strengthening floor joists, laying proper flooring, fitting a sturdy loft ladder, and making sure it's all properly insulated and ventilated.
Is Your Loft Ready for a Storage Conversion?
Before you start dreaming of a perfectly organised, clutter-free home, you need to get real about the space you've got. A quick, honest assessment of your loft is the essential first step. It’s this initial check-up that will tell you if the project is feasible, how complex it might be, and what sort of budget you’ll need. Get this bit right, and your entire project will be built on a solid foundation.
This decision tree infographic is a great visual guide to the key questions you need to ask.
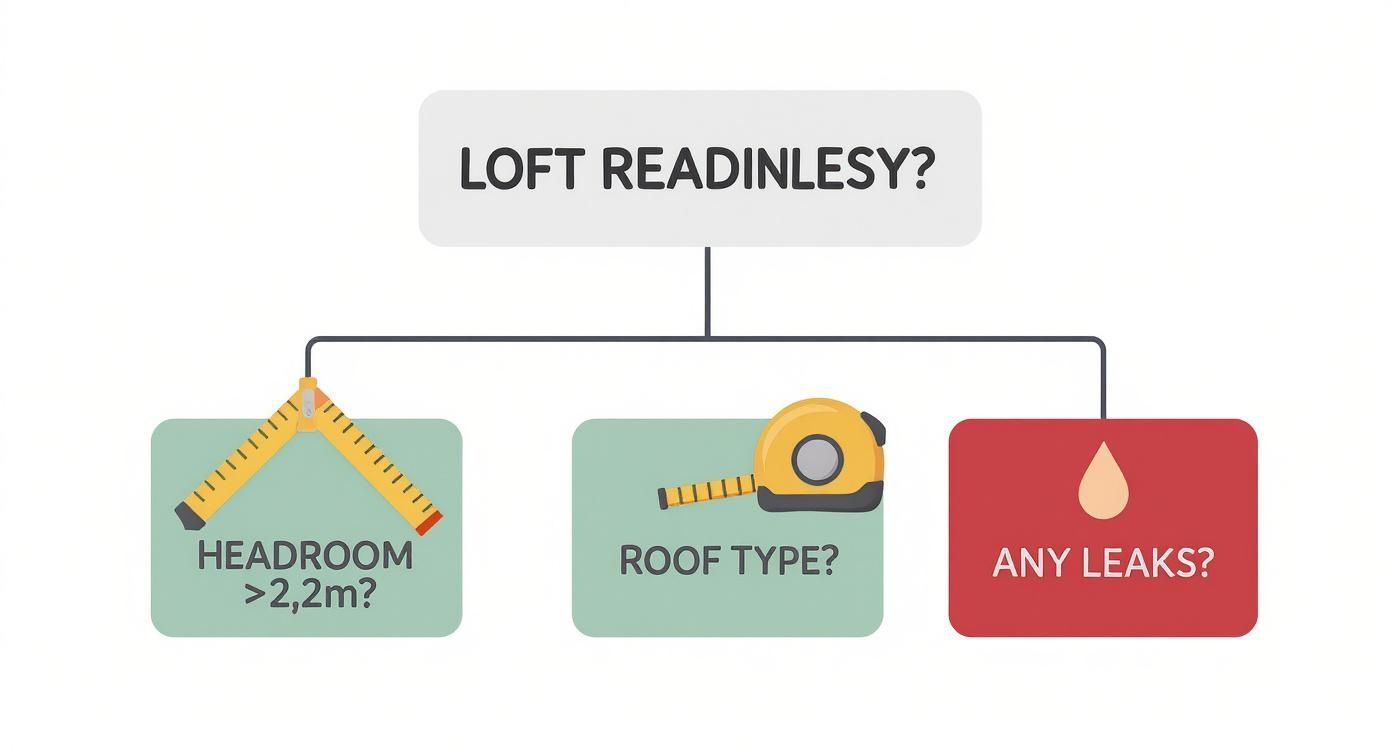
As you can see, it really boils down to three main things: headroom, the type of roof you have, and the overall condition of the loft space. These are the make-or-break factors that determine whether your project can get off the ground smoothly.
To make this even easier, I've put together a quick checklist. Use this to walk through your own assessment.
Loft Suitability Checklist
Use this checklist to quickly assess your loft's potential for a storage conversion.
| Check | What to Look For | Why It Matters |
|---|---|---|
| Headroom | The vertical distance from the ceiling joists to the roof's highest point. | You need at least 2.2m for a usable space and to meet basic requirements. |
| Roof Structure | Identify if you have an open 'M-shaped' traditional roof or a 'W-shaped' trussed roof. | Trussed roofs are more complex and costly to convert as the supports can't just be removed. |
| Existing Issues | Signs of damp, leaks, mould, pest infestations (e.g., droppings, nests), or woodworm. | These problems must be fixed before you start boarding; ignoring them will cause bigger issues later. |
Once you've worked through this list, you'll have a much clearer picture of what's involved in your specific project.
The Headroom Test
The very first thing to measure is the headroom. It’s the single most important factor. Grab a tape measure and find the distance from the top of the ceiling joists below your feet to the underside of the ridge board—that's the timber beam at the absolute peak of the roof.
For a storage space to be genuinely practical, you really need a minimum of 2.2 metres (about 7 feet 2 inches) at the highest point. Any less than this, and the project becomes much more complicated, and the finished space just won't be very easy to move around in.
This isn't just a rule of thumb. Building Regulations for habitable conversions often cite this height, and while a storage-only space has fewer rules, it's a solid benchmark that influences cost and usability.
Identifying Your Roof Structure
Next, pop your head up into the loft and take a good look at the timber framework. You’ll almost certainly have one of two types of roof structure.
- Traditional Cut Roof: Typically found in homes built before the 1960s, these have rafters and ceiling joists that were cut to size on-site. The space tends to be quite open, with an M-shaped profile. These are usually the easiest and most cost-effective to convert for storage.
- Modern Trussed Roof: If your house is newer, you’ll likely see a web of W-shaped timber trusses. These are pre-fabricated in a factory and provide essential support. Converting a loft with a trussed roof is a much bigger job because you can't simply cut the trusses without compromising the entire roof structure. It always requires a professional design.
Knowing your roof type from the outset gives you a realistic expectation of the work involved. A traditional roof might just need its joists strengthening, but a trussed roof will need a structural engineer to figure out how to safely redistribute the loads.
Inspecting for Pre-existing Problems
Finally, do a thorough sweep for any underlying issues that need fixing before a single board is laid. A powerful torch is your best friend for this job. You’re looking for:
- Damp or Leaks: Check for any water stains on the timbers or the felt lining. Pay close attention to areas around the chimney stack or where different roof sections meet.
- Pest Infestations: Have a look for evidence of uninvited guests. Wasp nests are common, as are droppings from rodents or signs of woodworm (little pinprick holes in the timber).
- Ventilation Issues: If the loft feels stuffy or smells damp, it's a sign of poor airflow. This is a red flag, as boarding the space can trap moisture and lead to condensation or mould.
If you live in an older property, you also need to be vigilant for hazardous materials. Before you disturb anything, it's crucial to understand how to remove asbestos safely and what precautions to take.
Finding these problems now might feel like a setback, but it’s far better than discovering them halfway through the project when they’ll cause major delays and costs. If you do find issues that need an expert eye, bringing in some reliable handyman services in Bristol can be a smart move to get them sorted out properly from the start.
Getting to Grips with Regulations and Permissions

Let's be honest, dealing with official rules can feel like the most tedious part of any home project. The good news? For a simple loft storage conversion, the red tape is much less of a headache than for a full, habitable room. The trick is knowing the difference between Planning Permission and Building Regulations.
For most people, Planning Permission won't even be on the radar. Turning your loft into a storage space almost always falls under 'permitted development rights'. This is a huge plus, as it means you can skip a formal application to the local council, provided you’re not altering the outside of your house (like adding a big dormer window, for instance).
But don’t get too comfortable. Just because you sidestep planning permission doesn't give you a free pass on safety standards. This is where Building Regulations come in, and they are nearly always a requirement.
Why Building Regulations Are Your Best Friend (Seriously)
Instead of seeing Building Regulations as a hurdle, think of them as your project's quality control. They're there to make sure any work done on your home is structurally solid, fire-safe, and energy-efficient. Getting this right isn’t just about ticking a box; it protects you, your family, and your home's future value.
When a building inspector calls round, they aren't there to catch you out. Their job is simply to confirm that the work meets a basic safety standard. For a loft storage project, they'll be laser-focused on just a few key areas.
A huge misconception I hear all the time is that just boarding out a loft for boxes means you can skip the regulations. That’s not the case. The second you install a permanent ladder and flooring, you're changing the structure and adding weight, which automatically puts the project under the watchful eye of Building Regulations.
Failing to get the work signed off can cause massive headaches when you decide to sell up. Without that crucial completion certificate, you have no official proof the work was done safely and correctly.
The Three Pillars of a Compliant Loft
Thankfully, for a storage-only project, the regulations are pretty straightforward. It all boils down to three core elements that make your new space safe and usable. Nail these, and you're on the right track.
An inspector will primarily want to see that your project has properly addressed:
- Structural Integrity: Can the floor actually take the weight of all your stuff?
- Fire Safety: Is the space reasonably safe from fire, and does it compromise the safety of the floor below?
- Safe Access: Can you get in and out without risking your neck?
Let's unpack what these mean in the real world.
Beefing Up Your Loft Floor
Your existing ceiling joists were only ever meant to do one thing: hold up the plasterboard ceiling. They were never designed to support heavy boxes, old furniture, or you walking around. Just laying boards directly onto them is a mistake waiting to happen and can lead to serious structural problems down the line.
To satisfy Building Regulations, the floor must be strengthened. There are a couple of common ways to do this:
- Sistering the Joists: This involves bolting new, chunkier timber joists alongside the existing ones to bulk them up.
- Creating a Raised Subframe: A popular and often better solution is to install a raised system using products like Loft Legs. This creates a "floating" floor above the original joists. Not only does this spread the load properly, but it also crucially avoids squashing your insulation – a must for keeping your home energy-efficient.
A good loft company or a structural engineer can tell you which method is best for your home, making sure the new floor can handle a storage load of at least 25kg per square metre.
Sorting Out Fire Safety and Access
Finally, the rules make sure you can get into your loft safely. This isn't a job for a wobbly stepladder. It means installing a proper, dedicated loft ladder that is securely fixed to the hatch frame and built to last.
Fire safety is just as important. While you don't need the elaborate fire doors and protected stairwells required for a bedroom, you can't compromise the existing fire barrier between the loft and the rest of the house. This usually means fitting a new, insulated loft hatch that has a 30-minute fire-resistance rating and is fitted with draught-proof seals. It’s a simple upgrade that makes a world of difference.
Laying the Groundwork: Why Your Loft Floor is So Important
The real make-or-break element of a loft storage conversion isn't the clever shelving you fit at the end; it's the floor right under your feet. One of the most common—and dangerous—mistakes people make is just screwing chipboard directly onto the existing ceiling joists. Trust me, that's a shortcut you absolutely cannot afford to take.
Think about it: your home's ceiling joists were only ever meant to hold up the plasterboard ceiling in the room below. They were never designed to carry the weight of heavy boxes, old furniture, or you walking around up there. Overloading them is a recipe for disaster, leading to sagging ceilings, ugly cracks in the plaster, and in the worst-case scenario, a catastrophic structural failure. Getting the foundation right is non-negotiable for a safe, long-lasting storage space.
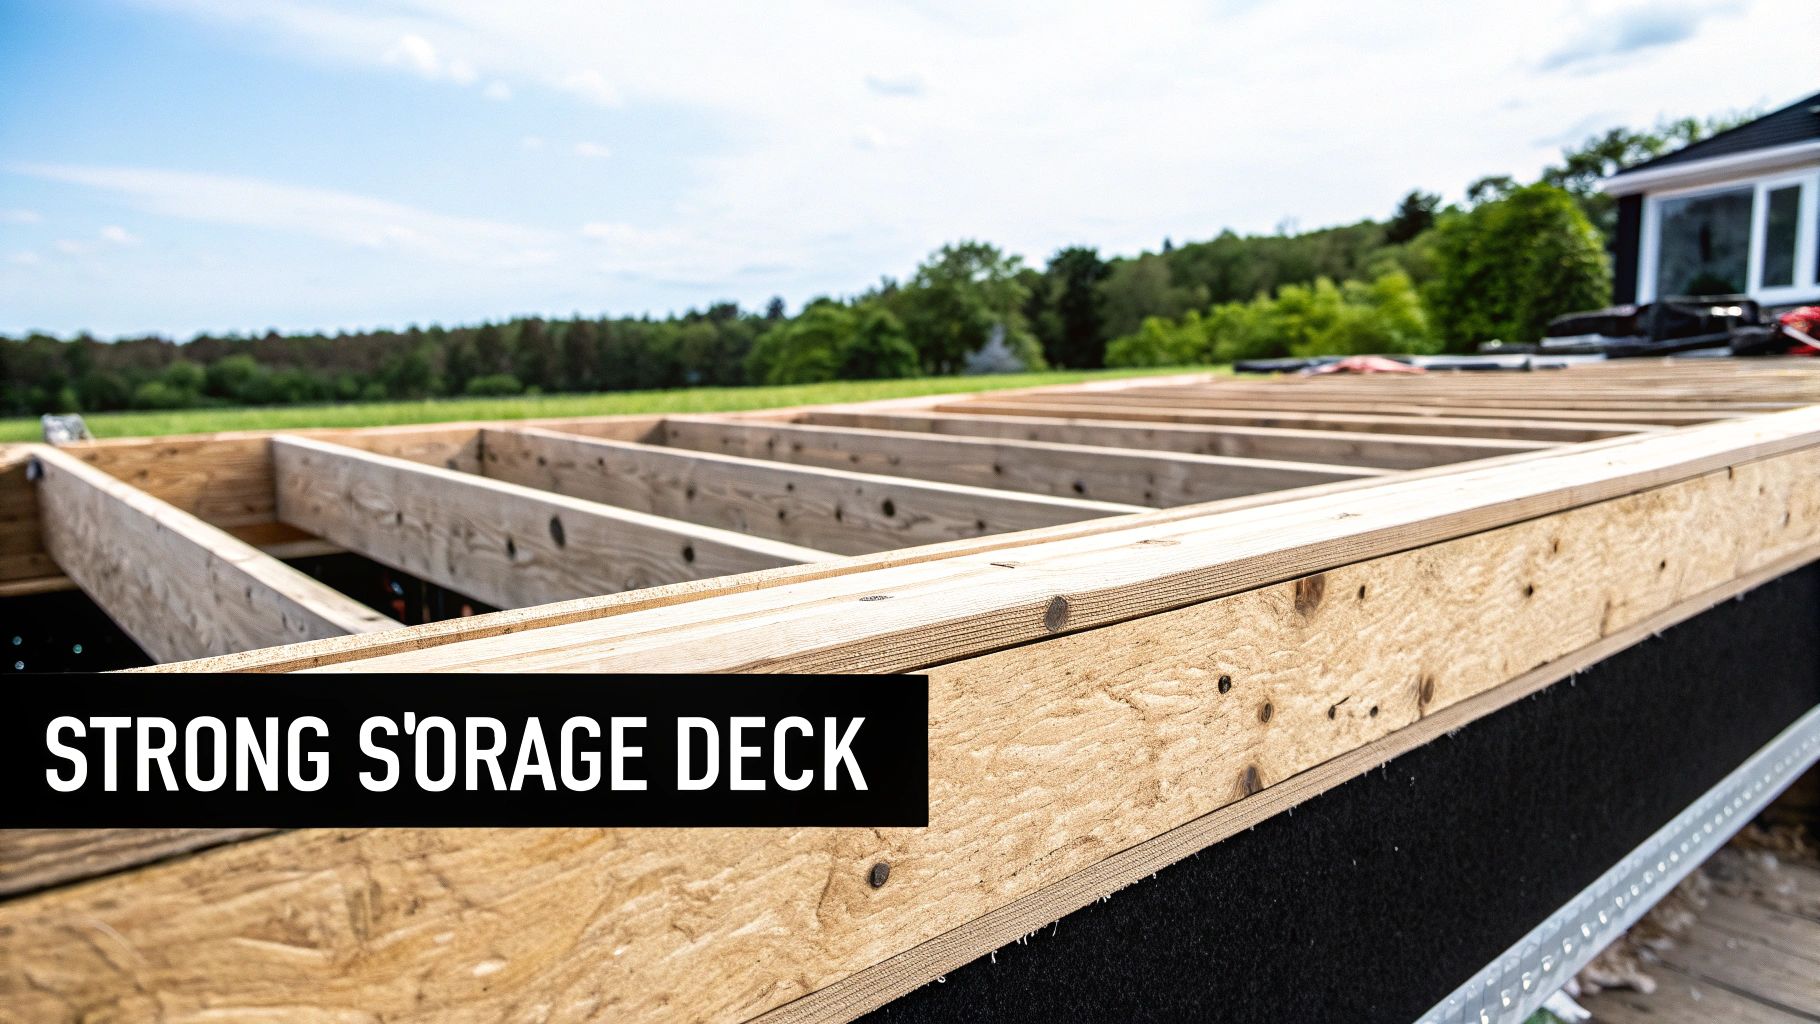
Building Above the Joists, Not On Them
So, how do you create a floor that's actually fit for purpose? The aim is to build a new, raised storage deck that’s strong enough for your gear without putting your home's structure at risk. This nearly always means creating a subframe that lifts the new floor level well above the existing joists.
This approach cleverly solves two problems at once. First, it spreads the weight of your stored items across the home’s load-bearing walls, instead of concentrating it on the weakest part of the ceiling. Second, and just as important, it creates a crucial air gap for your insulation, stopping it from being squashed flat and becoming useless.
Never, ever board directly onto your ceiling joists. The only correct way is to create a raised subframe. This strengthens the new floor and, critically, protects your home's insulation. It's the absolute cornerstone of a proper loft storage project.
Thankfully, specialist products have made this job a lot simpler than it used to be. Instead of wrestling with a heavy, custom-built timber frame, many professional installers and clued-up DIYers now use systems designed specifically for this job.
Why a Raised System is Now Standard Practice
One of the most popular solutions is a stilt system, like the well-known Loft Legs. These are essentially heavy-duty, adjustable plastic stilts that you screw directly onto the top of your existing ceiling joists. A new timber subframe is then fixed on top of the stilts, creating a rock-solid, elevated grid to lay your loft boards onto.
This method has some serious advantages:
- It Protects Your Insulation: The floor is raised high enough to accommodate the government-recommended 270mm of quilt insulation without compressing it. Squashed insulation can lose over 50% of its thermal efficiency, so this is a huge deal for your energy bills.
- It Adds Proper Support: The system is engineered to distribute the storage load safely, transforming a flimsy ceiling structure into a genuinely robust storage platform.
- It's Quicker to Install: Compared to building a full timber subframe from scratch, these systems are much faster and easier to fit, which can save a lot on labour costs.
By creating this independent raised deck, you end up with a floor that doesn't rely on the weak ceiling below it. It’s a solid solution that keeps Building Control happy and ensures your loft is both safe and energy-efficient.
Choosing the Right Loft Insulation
With your subframe planned out, the next thing to get right is the insulation. This isn't just about keeping your stored items from freezing or boiling; it’s about stopping heat from pouring out of your home. Get this right, and you'll see a real difference in your heating bills.
The type of insulation you pick usually comes down to your budget, how easy the loft is to work in, and what level of thermal performance you're after. For most projects, the choice is between mineral wool and rigid foam boards.
Let's break down the two main options:
| Insulation Type | Key Features | Best For |
|---|---|---|
| Mineral Wool (Quilt) | Affordable, very easy to roll out between joists, great for sound absorption. | The go-to for a cost-effective job. Perfect for filling the space between and over joists under a raised floor. |
| Rigid Foam Boards | Higher thermal performance for its thickness, moisture-resistant, can be cut for a snug fit. | Insulating the rafters (the sloping part of the roof) if you're aiming for a 'warm loft' space. |
For most standard "cold lofts"—where you're only insulating at floor level—mineral wool is the obvious choice. The standard method is to lay a 100mm layer between the joists, then add a 170mm layer running at a right angle across the top of them. This is done before your raised subframe goes in. This cross-layering technique is brilliant for eliminating cold spots (known as thermal bridging) and giving you total coverage.
If you're thinking of insulating the rafters as well, maybe to protect sensitive items from extreme temperature swings, then rigid foam boards are your best bet. They pack a bigger insulating punch in a slimmer profile. Just be aware that the installation is more complex and you must leave an air gap for ventilation to avoid condensation problems.
Ultimately, getting this combination of a solid floor and proper insulation right is what turns a dusty, forgotten space into a genuinely valuable part of your home.
Getting In and Seeing What You’re Doing: Loft Access and Lighting
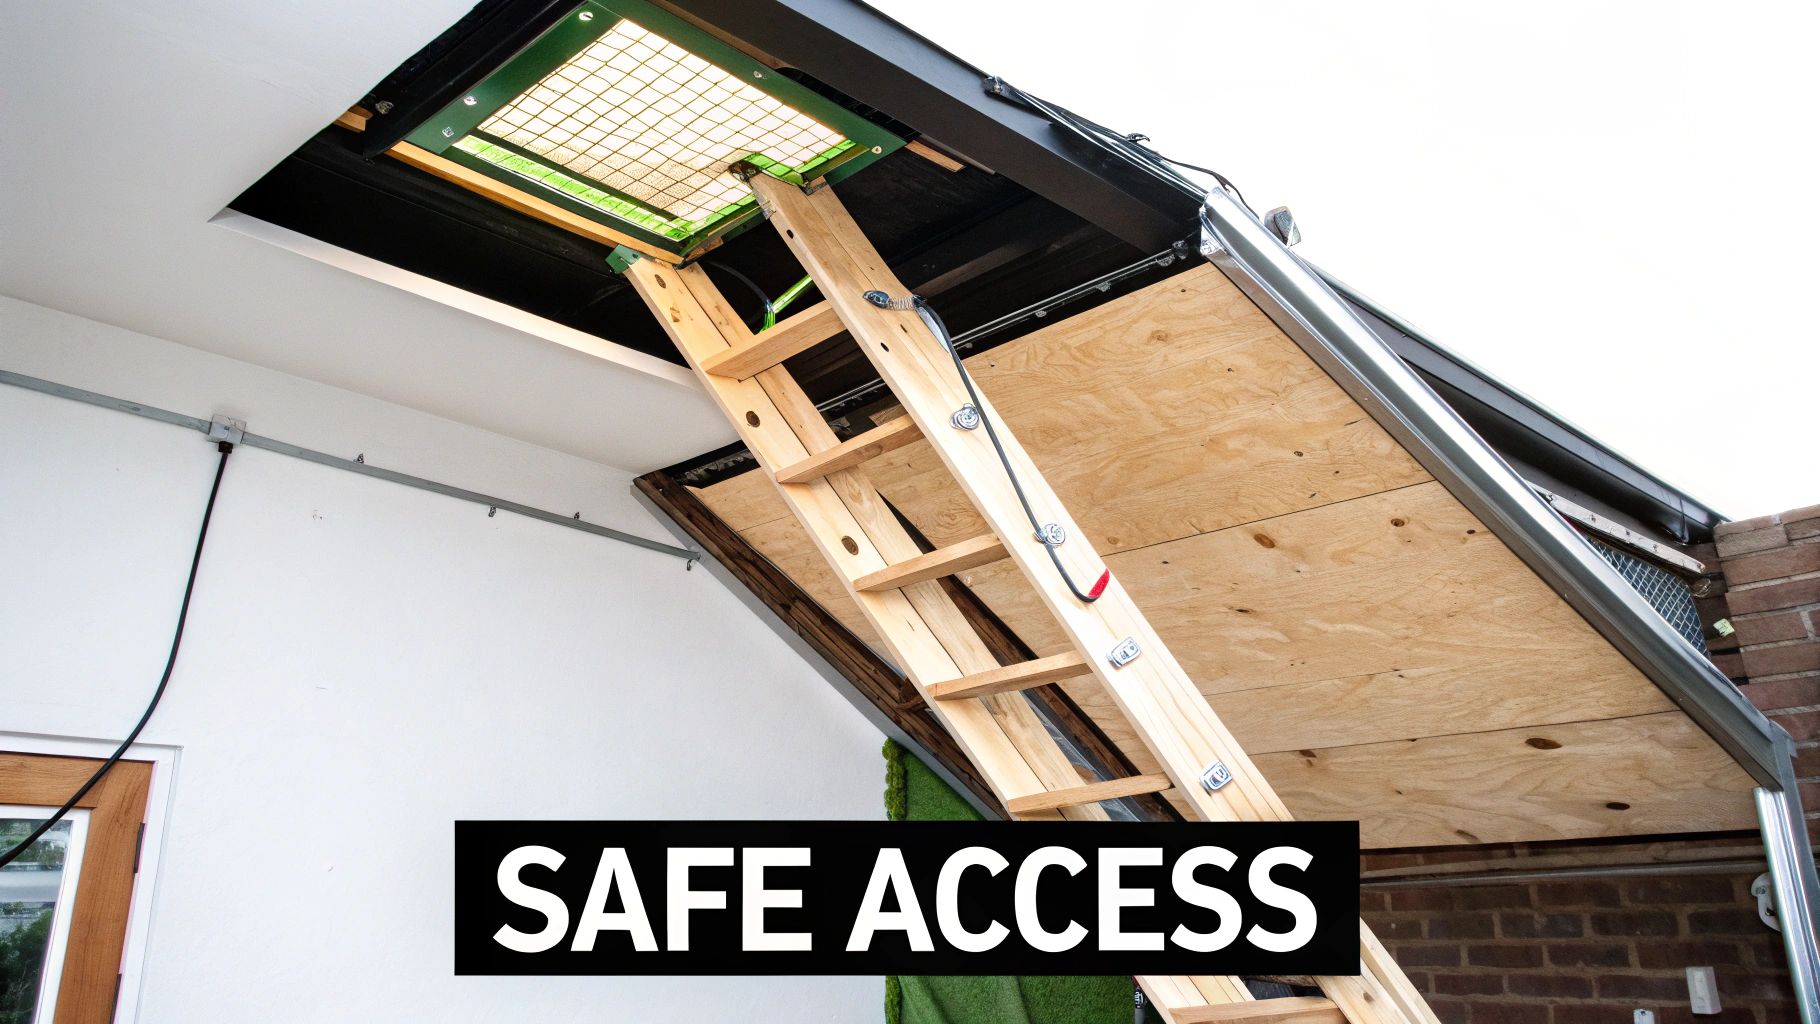
A beautifully boarded and insulated loft is pointless if you can't get into it safely or see a thing once you're up there. A wobbly stepladder and a head torch just won’t cut it. Your brilliant new storage space will end up being a dusty, forgotten zone you never want to brave.
This is where getting the access and lighting right from the start is so important. A professionally fitted loft ladder isn't just a nice-to-have; it's a core safety feature. Trying to haul a heavy box of old photos up a precarious ladder is an accident waiting to happen. A permanent, properly installed ladder makes popping up into the loft effortless and safe, meaning you'll actually use it.
Choosing the Right Loft Ladder
So, which ladder is best for you? It really boils down to three things: the space you have on your landing and in the loft, how often you’ll be heading up there, and what you’re willing to spend. There are a few solid options on the market.
- Sliding Aluminium Ladders: These are your classic, no-fuss choice and often the most budget-friendly. They’re lightweight, easy to use, and consist of two or three sections that slide down. The only real downside is they need a bit of floor space inside the loft to store when pushed back up.
- Timber Folding Ladders: A real step up in quality. If you plan on using the loft regularly, these are fantastic. They feel incredibly sturdy, almost like a proper staircase, and often come with a handrail for that extra bit of confidence. They fold away neatly into an integrated, insulated hatch, looking very smart.
- Telescopic Ladders: A brilliant piece of engineering for tight spaces. If your landing is small or the hatch is in an awkward spot, a concertina-style telescopic ladder is the answer. It collapses down into a tiny, compact unit, solving a lot of access problems.
A quick tip from experience: think about what you'll be carrying. A solid timber ladder with nice wide treads and a handrail gives you so much more stability when you’re trying to manoeuvre a box with one hand. It’s usually worth the extra cost for the peace of mind.
Before you buy anything, get your tape measure out. You need the exact floor-to-ceiling height and the dimensions of your current loft opening to make sure your new ladder will fit perfectly.
Lighting Up Your New Space
Good lighting is non-negotiable. A dark, spooky loft is a nightmare to organise, and you’ll never find what you’re looking for. Forget about trailing an extension lead up from the landing – it's both a trip hazard and a fire risk. You need proper, professionally installed lighting.
This is a job for a qualified electrician, no question about it. They’ll ensure all the wiring is safe and meets UK regulations (Part P of the Building Regulations), which is crucial for both safety and your home insurance.
For a storage loft, you don’t need anything fancy. Simple and effective is the way to go.
- LED Batten Lights: These are the modern, energy-efficient replacement for old-school fluorescent tubes. A couple of these will flood the space with bright, even light, getting rid of all the dark corners.
- Simple Pendant Lights: For a smaller loft, a single, bright pendant light with an LED bulb is often all you need. An electrician can wire it to a simple pull-cord switch right next to the hatch, so it’s easy to turn on as soon as you pop your head up.
Don’t Forget to Let it Breathe: Ventilation
Finally, let's talk about air. When you seal up your loft with new flooring and a draught-proof hatch, you can accidentally trap warm, moist air rising from the rest of the house. With nowhere to escape, this moisture can lead to condensation, damp, and mould – a recipe for disaster for your stored belongings.
The fix is surprisingly simple: passive ventilation. A good roofer or loft specialist can fit a few discreet tile or slate vents into your roof. These allow a gentle flow of fresh air to move through the space, carrying away any moisture without making the loft cold.
Proper ventilation is the key to making sure your stored treasures, from wedding albums to winter coats, stay dry and in perfect condition for years to come. If you've got a lot to clear out before the work starts, using professional removals and storage can be a lifesaver, keeping your things safe in a climate-controlled unit. It's also worth noting that purpose-built loft windows can be a great addition, not just for natural light but for helping with airflow too.
Budgeting Your Loft Storage Conversion
Let's talk numbers. Working out what a loft storage conversion will actually cost can feel like a bit of a dark art, but getting a realistic budget in place from the start is the key to a stress-free project. The final figure isn’t just one lump sum; it’s a total made up of many different parts, from the size of your space to the materials you choose and whether you bravely tackle it yourself or call in the professionals.
Understanding these variables is the best way to manage your spending and keep your expectations in check. A basic, DIY job in a small terraced house will have a completely different price tag to a professionally installed, fully-boarded space with a fancy ladder in a large detached property.
It's also crucial to remember that this is a storage conversion, not a full, habitable room. The costs are in different leagues entirely. As of 2025, a proper habitable loft room can set you back anywhere from £25,000 to £65,000, so what we're planning here is a far more accessible project.
What Really Influences the Final Cost?
A few key factors will always have the biggest impact on your budget. Before you start ringing around for quotes, have a think about how each of these applies to your own loft, as they're the main drivers of the total price.
- Size of the Loft: It’s simple, really. The bigger the area you want to board, the more you'll spend on flooring, insulation, and the subframe to support it all. Labour costs naturally go up with the square meterage too.
- Choice of Materials: This is where you can save or splurge. Opting for high-quality, moisture-resistant chipboard and a sturdy timber folding ladder will cost more than basic boards and a simple aluminium ladder.
- DIY vs Professional Installation: Going the DIY route can save you thousands in labour costs, which is very tempting. But it demands your time, a decent level of skill, and having the right tools. A professional job is much faster, comes with a guarantee, and you're paying for their expertise and efficiency.
- Structural Work: If your joists need strengthening or you have a modern trussed roof that requires some clever structural workarounds, this will add a fair amount to the cost and complexity.
- Additional Features: Don't forget the extras. The cost of hiring a qualified electrician to install a light and a switch, or a roofer to add a roof vent, needs to be factored in separately from the main job.
A Real-World Cost Breakdown
To give you a clearer picture, it helps to see the numbers side-by-side. Here’s a sample breakdown for a standard 20m² loft storage project, comparing a DIY approach with a professional installation.
Sample Loft Storage Conversion Cost Breakdown
This table gives a ballpark idea of where your money goes. Remember, material costs can fluctuate, and labour costs will vary depending on your location.
| Item / Service | Estimated DIY Cost (£) | Estimated Professional Cost (£) |
|---|---|---|
| Loft Ladder & Hatch | £150 – £400 | £400 – £800 |
| Raised Subframe (e.g., Loft Legs) | £150 – £250 | Included in Labour |
| Loft Boards (20m²) | £200 – £350 | Included in Labour |
| Insulation (270mm) | £300 – £500 | £500 – £800 |
| Labour | N/A | £800 – £1,500 |
| Basic Electrics (1 Light) | Hire Electrician (£150-£250) | Hire Electrician (£150-£250) |
| Total Estimated Cost | £950 – £1,750 | £1,850 – £3,350 |
As you can see, the savings on a DIY job are significant, but it comes down to whether you have the time and confidence to do it right.
A crucial bit of advice: these are guide prices. A professional quote should give you a fixed cost, but if you're going DIY, always build in a 10-15% contingency fund for those inevitable unexpected issues or extra materials you forgot.
Project Timelines: DIY vs Professional
Time is another resource you need to budget for. A specialist team that does loft storage conversions day in, day out can often complete the entire job—ladder, flooring, and insulation—in just one to two days. They're in, they're out, and it's done.
If you're taking it on yourself, be realistic. For someone with good DIY skills, the project will probably take two or three full weekends to complete properly. Rushing things can lead to mistakes that are a real headache to fix later on.
And don't forget the prep work! You'll need to clear the loft out before you can even start. If your house is already bursting at the seams, it's worth considering temporary storage. You can learn more about renting storage in Bristol from our guide; it can be a lifesaver for keeping your home chaos-free during the project.
Got a Few Lingering Questions?
It's completely normal to have a few questions swirling around as you get ready to kick off a project like this. A loft storage conversion is a smart move, but you want to get it right. Let's tackle some of the most common queries I hear from homeowners, so you can move forward with total confidence.
Do I Really Need a Structural Engineer?
For a simple job, probably not. If all you're doing is boarding out a small central patch just to stash the Christmas tree and a few suitcases, you can likely get by without one.
But it’s a different story if you're planning to board the entire loft floor, store anything with real weight to it (like old furniture or boxes of books), or if you live in a newer build with a modern trussed roof. In those cases, getting a structural engineer involved is the sensible, safe bet. They'll do the proper calculations and tell you exactly what’s needed to strengthen the joists. It’s a small upfront cost for genuine peace of mind.
Can I Just Board Straight Onto the Joists?
I see this all the time, and it's a huge mistake. The answer is a hard no. Your ceiling joists are only there to hold up the plasterboard ceiling underneath them, not to take the weight of your belongings or you walking around.
Worse still, laying boards directly on top of the joists crushes your insulation flat. Once that happens, it's pretty much useless, and you'll be losing a massive amount of heat through your roof. The proper way is to build a raised subframe (using a system like Loft Legs) that creates a new floor high above your insulation, keeping its 270mm depth intact. This protects your home's energy efficiency and spreads the storage load safely.
What's the Real Difference Between a Storage Loft and a 'Proper' Conversion?
This is a crucial distinction, and getting it wrong has major implications for cost, complexity, and the law.
- A Storage Conversion is all about creating a safe, strong, and accessible space for your stuff. It still has to follow Building Regulations for things like structural safety and access, but it's not designed to be a liveable room.
- A Habitable Conversion is about creating a brand-new room, like a bedroom or home office. This is a whole different ball game. It falls under much stricter Building Regulations covering everything from fire doors and protected staircases to minimum headroom and ventilation.
A habitable conversion is a major construction project. A storage conversion, on the other hand, is a much more straightforward and affordable way to gain valuable space.
The moment you add a fixed ladder and lay a floor, you are changing the loft’s structure. This automatically means the project has to comply with Building Regulations, even if it's "just for storage". Trying to skip this can create huge headaches when you decide to sell your house later on.
How Much Value Will This Actually Add to My Home?
This is a great question. While a full bedroom conversion is obviously a big value-booster, a dedicated loft storage space adds a different kind of practical appeal that buyers love. When people are viewing houses, a well-lit, properly boarded, and easily accessible loft is a massive plus. It screams "plenty of storage" and shows the house has been looked after.
While studies show a full habitable conversion can boost a property's value by a hefty 20% to 25%, a storage loft plays a different role. It might not add the same raw figure, but it makes your house far more desirable than a comparable one without it, often leading to a quicker sale at a better price. You can dive deeper into the numbers with this property value research from Greenmatch.co.uk.
Planning a move or just need to clear the decks before starting work? The team at SimplyPro Removal & Storage Ltd can help with professional removals, secure storage, and even handyman services to make everything run smoothly. Get your free quote today.