
Deciding whether to move a radiator yourself or call in a professional often boils down to one critical question: does the job involve new pipework?
If you're just shifting the radiator a few inches along the same wall and the existing pipes have enough give, a confident DIYer can usually handle it. But the moment you need to run new pipes, reroute them through walls, or get the soldering kit out, you're firmly in professional territory.
Should You DIY or Hire a Professional?
Moving a radiator is one of those jobs that seems straightforward on paper. That is, until you're halfway through, surrounded by black system sludge and a valve that just won't stop weeping. Making the right call—DIY or pro—is the key to avoiding a flooded floor and ensuring your heating works properly afterwards.
It really depends on your own skills, how complex the move is, and how much time you have. A simple reposition on the same wall, where the existing pipework has enough slack to reach, is a perfectly manageable weekend project for someone with a bit of plumbing know-how. You'll need a good set of tools, a healthy dose of patience, and a methodical approach to draining and reconnecting everything.
When to Call in the Experts
Things get complicated fast when the radiator needs to move to a different wall or even just a bit further down the same one. This almost always means extending copper pipes, which might involve chasing them into the wall or lifting floorboards. This is where a small mistake can snowball into a very big, very wet problem.
Here are some clear signs it's time to pick up the phone and call a professional heating engineer:
- Complex Pipe Alterations: If you need to cut, extend, or solder any pipes, it's a pro job.
- Older or Unfamiliar Systems: Got a tangle of old pipes you can't make sense of? An expert will know how to navigate it safely.
- Moving to a Different Wall: This is a non-negotiable. It always requires rerouting the pipework.
- Lack of Tools or Confidence: If you feel out of your depth at any point, it's far safer to stop and get help.
A professional plumber brings more than just the right tools; they bring the experience to spot potential problems before they happen. Crucially, they know how to properly balance the system afterwards to make sure all your radiators heat up evenly—a vital step that many DIYers overlook. For bigger projects, you can find trusted support with our integrated handyman services in Bristol.
Decision Guide: DIY vs. Professional Radiator Move
Use this quick comparison to decide if you should tackle the job yourself or hire a professional heating engineer.
| Scenario | DIY Recommendation | Professional Recommendation |
|---|---|---|
| Shifting a few inches on the same wall (with pipe slack) | Feasible. A good project if you have basic plumbing skills and the right tools. | Not essential. An engineer will do it faster, but it's a manageable DIY. |
| Moving to a different wall or further away | Not recommended. This requires extending pipework, which is a skilled job. | Essential. New pipe runs and potential system balancing require an expert. |
| You're in rented accommodation | Check your tenancy first! Most agreements require professional work. | Almost always required. Get landlord permission and use a qualified engineer. |
| Working with an old or complex heating system | High risk. It's easy to cause wider system problems. | Strongly recommended. An expert can navigate old pipework safely. |
| You need to cut, join, or solder copper pipes | Avoid. Improper joints are a major cause of leaks. | Essential. A heating engineer is qualified to make secure, lasting connections. |
| You're not confident draining the system | Stop and reconsider. This is the first and most critical step. | Recommended. They can drain, move, and recommission the system correctly. |
Ultimately, if there's any doubt, calling a professional is always the safest and most reliable option to protect your home and your heating system.
Regulations and House Moves
Moving a radiator isn't just a practical task—it's also a regulated one, especially when you're moving house. Repositioning a radiator can alter a room's heat load by 10–20%, which can throw your home's energy efficiency out of whack.
UK Building Regulations state that any changes to a heating system must be correctly sized and balanced. This is particularly important in the older properties often found in Bristol and Bath, where moving just one radiator can unbalance the entire circuit, leaving you with cold spots elsewhere in the house.
Getting Your Gear and Prepping the Area
Any seasoned plumber will tell you that a job goes smoothly when the prep work is done right. Before you even lay a hand on a valve, getting your tools together and prepping the room properly will save you a world of watery grief later on. Think of it as your mission briefing before the main event.
First things first, let's get your kit sorted. You can't tackle this with just blind optimism and a single spanner. Having everything you need laid out and ready to go means you won't be frantically searching for something while water is trickling onto your floor. That’s usually when things go wrong.
The Essential Toolkit
Here’s a no-nonsense list of what you’ll want to have within easy reach:
- Adjustable spanners: You need two. One holds the body of the valve steady while the other loosens the nut connecting it to the radiator. This is crucial for avoiding twisted pipework.
- Radiator bleed key: This small, indispensable tool is for letting air and pressure out.
- A shallow tray: A paint roller tray works a treat here. It’s perfect for catching that first bit of water when you crack the nuts open.
- Old towels and dust sheets: Trust me, there will be drips. And if your system has any sludge in it (most do), that black water stains everything. Be generous with the floor protection.
- A large bucket: For draining the main body of water out of the radiator.
- PTFE tape: Essential for getting a good, watertight seal on the valve threads when you put it all back together.
- Wet-and-dry vacuum: This is optional, but it’s an absolute game-changer for mopping up any spills quickly and cleanly.
Having all this ready stops that heart-sinking moment when you have a slow leak and the right tool is nowhere to be found. It’s also a smart move to have any new parts—like pipe extensions or fresh valves—before you begin. There’s nothing more frustrating than having a radiator off the wall only to find you need a part from a shop that’s just shut.
Making the Space Safe
With your tools lined up, it’s time to get the area safe. This part is non-negotiable.
Start by shutting down your boiler and the entire central heating system at the mains. This ensures the pump can’t unexpectedly fire up and start circulating water while you’re mid-job.
Next, give the system plenty of time to cool down completely. Draining a hot radiator is a recipe for serious burns, so don't rush it. This can easily take an hour or two, so patience is key.
Expert Tip: Before you undo a single nut, grab your phone and take a few clear pictures of how the pipes and valves are currently connected. It's a simple step, but having a visual reference for how it all goes back together is priceless, especially if you get sidetracked.
Finally, get the room itself ready. Spread out your dust sheets and bunch up some old towels directly under the valves at both ends of the radiator. A single radiator can hold a surprising amount of water, and it's often black, sludgy stuff that you do not want on your floors. Good prep work is the sign of a job well done. Once you’re all set, you’re ready to get started on the disconnection.
Draining and Disconnecting Your Radiator
Right, this is where the real work begins. You've got your tools laid out and the floor is protected, so it's time to get this radiator drained and disconnected. The secret here is to be patient and methodical—rushing is how you end up with a mess.
First things first, you need to isolate the radiator from the rest of your central heating system. This just means stopping any more water from getting into it. To do that, you'll close the two valves, one at each end. You'll likely see a Thermostatic Radiator Valve (TRV) on one side (the one with numbers on it) and a lockshield valve on the other, which usually has a plastic cap.
Twist the TRV clockwise as far as it will go, usually to the '0' or 'off' setting. Then, pop the plastic cap off the lockshield valve and use your adjustable spanner to turn the spindle inside clockwise until it's fully closed.
A Pro Tip You Can't Skip: As you close that lockshield valve, count exactly how many turns it takes—including half or quarter turns. Seriously, write this number down. Forgetting it is a classic rookie mistake, and you'll need it later to re-balance the system properly when you put everything back together.
Releasing the Pressure and Draining the Water
With the radiator cut off from the system, it's time to get the water out. Grab your radiator bleed key, a shallow tray, and a bucket. Slide the tray right under the big nut that connects the valve to the radiator—this is called the union nut.
Now, this next part is crucial: you absolutely must use two spanners. Grip the body of the valve with one spanner to keep it rock steady. If you don't, you risk twisting the copper pipe in the wall, and that’s a much bigger problem. Use your second spanner to slowly turn the union nut anti-clockwise. Just a small turn is all you need. You'll hear a hiss of air, then water will start to trickle out.
This simple infographic breaks down the core prep steps for safely tackling a radiator move.
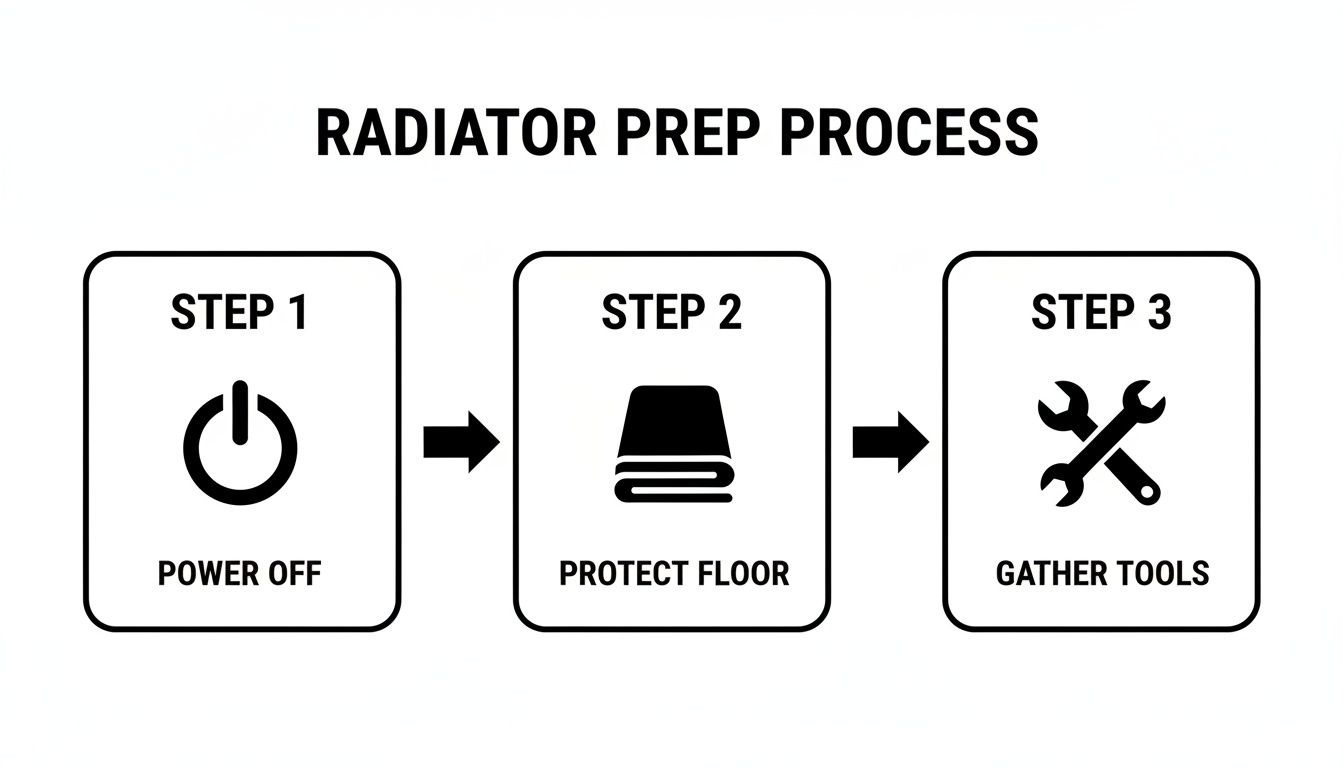
As the visual shows, getting these basics—power off, floor protected, tools ready—right from the start makes the whole job run smoother.
Once that first trickle of water slows to a dribble, head to the top of the radiator and find the bleed valve. Use your radiator key to open it up (turn it anti-clockwise). This lets air in at the top, which pushes the water out much faster from the union nut below. Keep that bucket ready to catch it all.
Taking the Radiator Off the Wall
When the water finally stops flowing, you can fully unscrew the union nut on the TRV side. Move your tray over to the lockshield valve and do the same thing on that side, again using two spanners to be safe. Once both valves are disconnected, the radiator is free.
Be ready for the weight. Even empty, these things are seriously heavy and awkward to handle. I'd always recommend having a second person to help you lift it. Gently tilt the radiator to drain the very last drops of water into your bucket before you try to move it anywhere.
While you're working on plumbing, it never hurts to have other skills in your back pocket. Knowing how to fix a leaking pipe under your sink can be a lifesaver if any other unexpected drips appear.
One thing many people forget is the black, sludgy water (it’s actually magnetite) lurking at the bottom. This stuff is a nightmare and will stain carpets and floors in a heartbeat. Have a couple of plastic bags and some strong tape or proper decorator’s plugs on hand to cap the radiator's inlets the second it comes off the wall.
With the inlets sealed, you can lift the radiator clear of its wall brackets. The wall is now exposed, and you're ready to get on with the pipework for its new home.
Rerouting Pipes and Mounting the Radiator
With the old radiator off the wall, it's time for the creative part of the job: getting everything in place for its new home. This stage is all about extending the pipework and securely mounting the radiator, turning what was a blank wall into a working part of your heating system.
This is where you have a choice to make, and it really comes down to your skills and what tools you have. You can either go with modern push-fit connectors for a straightforward, solder-free job, or you can go the traditional route and solder the new pipework for a permanent, professional finish.
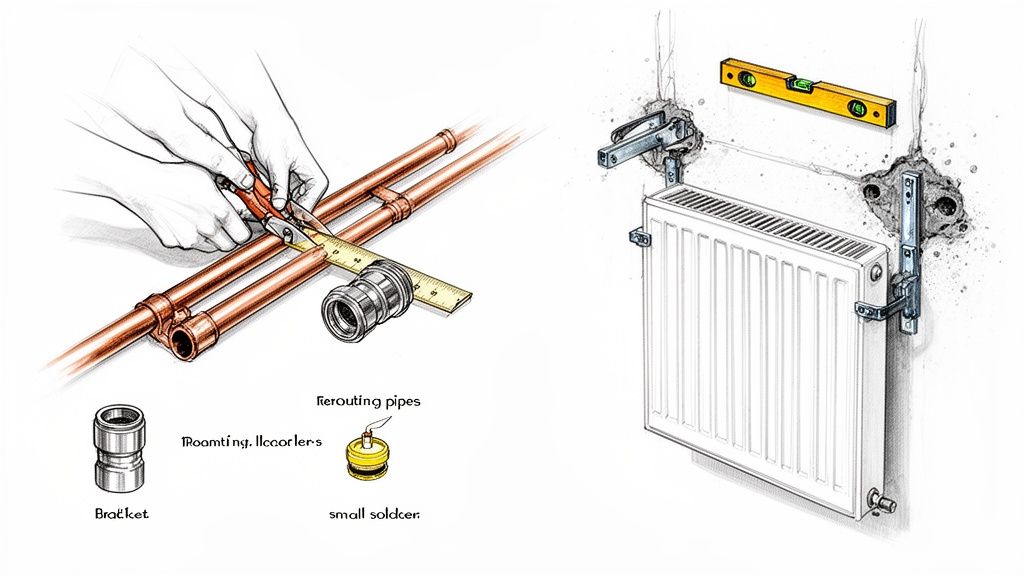
Getting the Pipework Extended
Whichever method you pick, the prep work is the same—and it’s absolutely crucial if you want to avoid leaks later. You need to measure the distance from the old pipes to the new radiator spot with real precision. Don't forget to factor in the extra space your new fittings and valves will take up.
When you cut your new copper pipe, please, don't reach for a hacksaw. Use a proper pipe slice or cutter. It's the only way to get a perfectly square and clean edge, which is essential for a watertight seal.
Once cut, you must deburr the inside and outside of the pipe end with a deburring tool. It’s a tiny step that people often skip, but it’s a classic rookie mistake. A sharp edge can easily shred the rubber O-ring inside a push-fit connector, which pretty much guarantees a leak down the line.
- Push-fit Connectors: These are a brilliant bit of kit for the keen DIYer. You just push the deburred pipe firmly into the fitting until you feel it click home. They create a solid, reliable seal without any need for a blowtorch or specialist skills.
- Soldering: This is the old-school, professional standard. It involves using a blowtorch to heat the joint and melt solder into it, forming an incredibly strong bond. It takes more practice and you need to be hot on your safety precautions, but the end result is very neat.
Mounting the New Brackets
Now that your pipes are extended and ready, you can get the brackets on the wall. Take your time here, because a wonky radiator doesn't just look awful, it can also trap air and affect its performance.
Grab your spirit level and a tape measure to mark the exact spots for the new brackets. Before you drill anything, double-check your measurements against the radiator itself to make sure they line up perfectly with its mounting points. Getting this right now saves a world of frustration when you're trying to lift a heavy radiator into place later.
Choosing the right wall fixings isn’t just a good idea—it’s essential. A standard 700mm x 1200mm double-panel radiator can weigh over 50kg when it’s full of water. The wrong wall plugs for your wall type is a recipe for disaster.
If you're going into solid brick or blockwork, standard wall plugs and screws will probably do the job. For plasterboard walls, though, you absolutely must use specialist cavity fixings. Things like hollow wall anchors or toggle bolts are designed to spread the load securely. The principles are much the same as for any heavy item; our guide on how to hang a heavy mirror has some really useful tips for securing things to different wall types.
Hanging and Reconnecting the Radiator
Once your brackets are firmly on the wall, it’s time to lift the radiator. Get a helper for this bit—they’re heavier and more awkward than they look! Carefully hook it onto the brackets.
Now you're ready to connect the valves.
Before you screw the valve tails (the threaded bits) into the radiator, wrap the threads with PTFE tape. Make sure you wind the tape clockwise—the same direction you'll be tightening the nut—about 5-7 times to create a watertight seal.
Finally, connect the union nuts from your valves onto the radiator tails. Just like when you disconnected them, use two spanners: one to hold the body of the valve steady and the other to tighten the nut. You want it firm, but don't go crazy and overtighten it.
If you’re taking this opportunity to upgrade to more efficient valves, you might find it helpful to know how to install thermostatic radiator valves. With everything reconnected, you're on the home straight and ready for the final stage: refilling the system and checking your work.
Refilling the System and Checking Your Work
With your radiator securely mounted and reconnected, you're on the home straight. But the job isn't quite done. Getting your heating system fully recommissioned, holding pressure, and absolutely leak-free is the final, crucial phase.
First things first, you need to get water back into the system. Find your boiler’s filling loop – it’s usually a silver, braided hose with one or two small taps on it. You'll want to open these valves slowly, letting cold water back into the pipes. Keep your eyes glued to the pressure gauge on the front of the boiler.
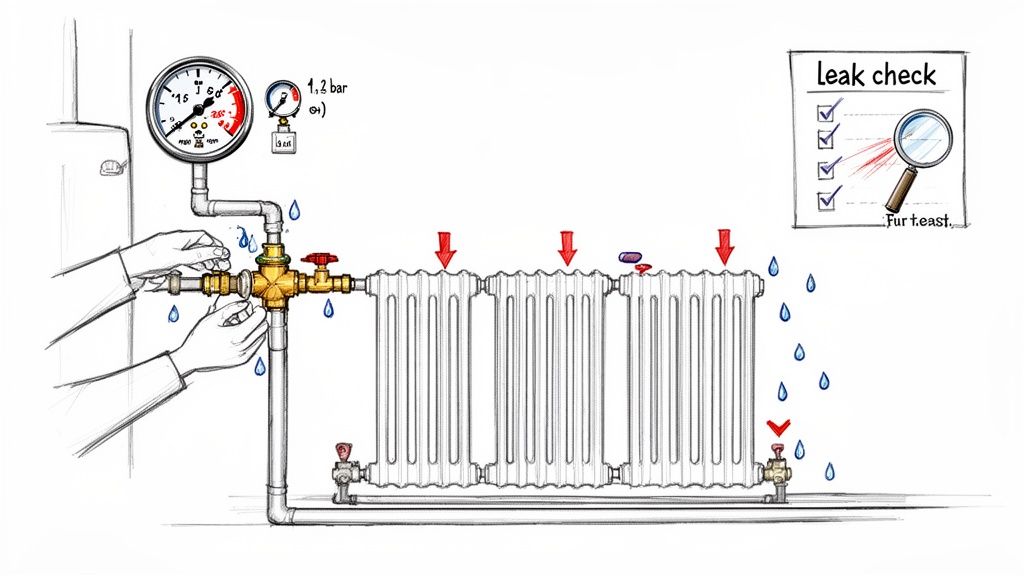
You’re aiming for a pressure of around 1 to 1.5 bar while the system is cold. Once the needle hits that sweet spot, make sure to close the filling loop valves firmly.
Bleeding the System to Remove Air
Draining the system always lets air in. That air gets trapped in the high points of your radiators, creating cold spots and stopping them from heating up properly. To get rid of it, you need to bleed every single radiator in the house, not just the one you've been working on.
A good rule of thumb is to start with the radiator furthest from the boiler (often the highest one in the house) and work your way back.
- Grab your radiator key and gently turn the bleed valve at the top of the radiator anti-clockwise.
- You’ll hear a distinct hissing sound as the trapped air escapes. Have an old cloth ready, as it can splutter a bit of water.
- The moment a steady trickle of water comes out, close the valve by turning it clockwise. Be careful not to overtighten it.
As you go from room to room bleeding radiators, the system pressure will inevitably drop. You'll likely need to pop back to the boiler and top it up again using the filling loop before you’re finished.
The Final Leak Check
This is the moment of truth. Before you even think about firing up the heating, grab a torch and a roll of kitchen paper. Meticulously inspect every single joint and connection you touched. The best trick is to dab the kitchen paper on the underside of each nut – it will reveal even the tiniest bead of moisture that your eyes might miss.
Once you’re absolutely confident everything is dry, go ahead and turn your central heating back on. Let the system get fully up to temperature. A hot, pressurised system is the ultimate test of your work.
As the pipes and joints heat up and expand, any connection that wasn't quite tight enough will often reveal itself. Go back and perform one last, thorough leak check on all your joints now that they're hot. If everything is bone dry, congratulations – you've nailed it.
Budgeting Time and Costs for Your Project
Knowing what to expect in terms of cost and time is crucial before you even pick up a wrench. Whether you're tackling this yourself or calling in the pros, getting a realistic handle on the budget will stop a simple job from turning into a costly nightmare.
If you're going the DIY route, your main outlay will be for materials. You're probably looking at somewhere between £30 and £80 for the essentials – things like copper pipe, a few push-fit connectors, new valves, PTFE tape, and a bottle of inhibitor fluid for when you refill the system. The biggest "cost" for a DIYer, though, is your own time. A seasoned pro might have it done in a morning, but if this is your first time, I'd strongly suggest setting aside a full day. This gives you plenty of breathing room to work slowly, double-check everything, and deal with any little hiccups without feeling rushed.
Professional Costs and Timelines
Bringing in a qualified plumber or heating engineer is the way to go for speed and peace of mind. For a simple job, like shifting a radiator a few feet along the same wall, you can expect a bill in the region of £200 to £400. This figure usually includes their labour and all the basic materials needed.
Of course, if the job gets trickier – say, it involves lifting floorboards or chasing new pipework into a solid brick wall – that price could climb towards £500 or more.
The huge advantage of hiring a professional is the efficiency. Most can get the entire job done and dusted in just 2 to 4 hours. That speed is a real lifesaver if you're on a tight schedule or the radiator is just one part of a bigger renovation project where you need to keep things moving.
Integrating a Radiator Move with a House Move
Here’s a great bit of forward-thinking: if you can, line up this job to happen during a house move. It's an incredibly smart way to do it. The room will be empty, giving the plumber clear access without needing to work around your furniture and protecting your carpets and flooring. This kind of coordination is becoming more and more common.
While a big chunk of the average £13,000 people spend moving house gets eaten up by legal fees and the removal company, savvy movers are budgeting for small trade jobs like this. It just makes sense. You can find plenty of industry analysis that backs this up.
By getting a plumber in on moving day or just after, you get the new room layout sorted from the get-go. It saves you that sinking feeling when you realise the only logical place for the sofa is right in front of the radiator.
When you think about the cost of bigger plumbing jobs, like finding out how much it costs to move a boiler, spending a few hundred pounds on moving a radiator is a relatively small investment that pays huge dividends in your new home's comfort and layout.
Planning a move in Bristol or Bath? Let SimplyPro Removal & Storage Ltd handle the heavy lifting while you coordinate the finishing touches. Find out more at https://www.simplyremovalsbristol.co.uk.