
When you’re moving house, the photos on your walls are more than just decoration – they’re your memories. Taking the time to properly pack your photo frames is the single most important thing you can do to avoid shattered glass, gouged custom frames, and the real heartache of losing something irreplaceable on the way. A little bit of care here goes a very long way in making sure your memories arrive at your new home in one piece.
Why You Can’t Just Wing It With Frames
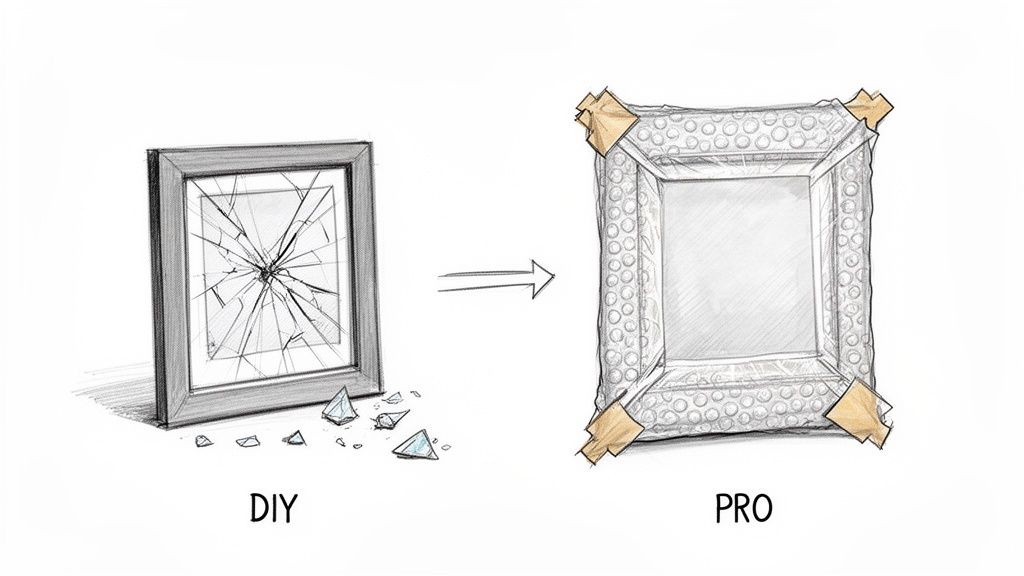
It’s easy to focus on the big furniture when you’re getting ready for a move in Bristol or Bath and just sort of… forget about the wall art and family portraits. But these are some of the most vulnerable items you own. A photo frame isn't a solid block like a bedside table; it's a fragile mix of wood or metal, delicate glass, and a precious image. Even a small bump or a bit of pressure in the wrong spot can cause serious, permanent damage.
The risks are bigger than just a simple crack. A bit of carelessness when packing your frames can quickly lead to:
- Shattered Glass: This is the number one problem. The shards can then easily tear, scratch, or ruin the photo underneath.
- Scratched or Dented Frames: If you've invested in ornate or custom frames, getting them repaired or replaced can be incredibly expensive. Proper cushioning is non-negotiable.
- Warped Backing: Stacking frames incorrectly can bend the whole structure, making it impossible to hang properly again.
- Ruined Photos: Moisture getting trapped by the wrong packing materials or deep scratches from broken glass can destroy the memory itself.
The Reality of Moving Day Damage
The difference between a quick DIY job and a proper packing method is huge. During a typical house move, photo frames make up about 12% of all fragile items that get reported as damaged. The numbers don't lie: professional packing has been shown to cut down on breakage by a massive 65%. Compare that to the shocking 23% of self-packed frames where the glass shatters during a bumpy ride in the van. You can find more insights on moving industry trends and how they highlight the need for proper protection.
Moving is stressful enough. The last thing you want is to unbox a treasured family photo and find it ruined. Taking an extra ten minutes to pack your frames correctly isn't just another chore; it’s an investment in protecting your personal history.
This guide will give you the practical, real-world advice you need to get every single frame safely from A to B, turning a risky job into a simple, straightforward task.
Gathering Your Packing Materials Like a Pro
Let's be honest, the secret to getting your photo frames from A to B in one piece comes down to having the right gear from the start. Winging it with old newspapers and a few bin bags is just asking for cracked glass and scuffed frames. A little prep work now saves a world of heartache later.
I always recommend setting up a dedicated packing station. It doesn't need to be fancy—a cleared-off dining table or a clean patch of floor works perfectly. Before you buy anything, get a feel for what you’re working with. Just like you'd figure out what size poster frame do I need for a new print, you need to measure your existing frames to get the right-sized boxes.
Your Essential Packing Toolkit
When it comes to protecting your memories, not all supplies are created equal. Investing in decent quality materials is one of the smartest things you can do during a move.
Think about your boxes. A double-walled cardboard box is far superior to the flimsy single-walled kind you get from the supermarket. It offers much better protection against being crushed when things inevitably get shifted around in the back of the van.
Another absolute must is acid-free tissue paper. This is a pro tip that makes a huge difference. Standard newsprint contains acids that can literally lift the ink from your photos or cause ugly yellow stains over time, which is a real problem for anything you plan on putting into storage.
The aim here isn't just to move your frames. It's to make sure they arrive looking exactly as they did when you packed them. Quality materials are your best insurance policy against a moving day disaster.
Before you start wrapping, it’s worth pulling together all the supplies you’ll need in one place. This checklist covers the essentials for giving your frames the protection they deserve.
Essential Packing Materials Checklist
| Material | Purpose and Key Features | Where to Get It |
|---|---|---|
| Double-Walled Boxes | Provides superior crush protection for fragile items. Choose various sizes to fit your frames snugly. | Removal companies, self-storage facilities, online suppliers. |
| Acid-Free Tissue Paper | Protects photos and artwork from acid damage, ink transfer, and yellowing. The first layer of defence. | Art supply shops, packing suppliers, online retailers. |
| Quality Bubble Wrap | Creates a cushioned barrier against impacts and scratches. Ensure bubbles are facing inwards for best results. | Most DIY stores, post offices, or packing specialists. |
| Cardboard Corner Protectors | Slips onto the corners of the frame to absorb shock from drops and bumps—the most vulnerable points. | Speciality packing suppliers, some removal companies. |
| Strong Packing Tape | Secures the box and ensures it stays sealed. Don't use masking tape or Sellotape; it's not strong enough. | Any hardware or DIY store. |
| Marker Pen | For labelling boxes clearly with "FRAGILE," "THIS WAY UP," and the contents/room. | Supermarkets, stationers. |
With these items ready, you’re set up to pack your frames safely and efficiently, eliminating a lot of the stress that comes with moving delicate possessions.
The Real Deal-Breakers for Frame Protection
Beyond the basics, a few specialist items truly separate an amateur packing job from a professional one. These are the things that tackle the most common causes of damage head-on.
- Cardboard Corner Protectors: I can't stress this enough—these are absolute game-changers. Frames are most likely to get damaged on the corners when they're dropped or knocked. These simple cardboard sleeves absorb that impact beautifully.
- Good Bubble Wrap: Not all bubble wrap is the same. The cheap stuff pops easily and offers very little real cushioning. Get a decent roll. A key tip: always wrap the frame in tissue paper first, before the bubble wrap. This stops the plastic bubbles from leaving little circular imprints on the glass or the frame's finish, especially in warm conditions.
- Proper Packing Tape: Your entire protective system relies on the box staying shut. A wide, strong packing tape is crucial to make sure the bottom of the box doesn’t give out under the weight of a few frames stacked inside.
Gathering these specific items means you're not just mindlessly chucking things into a box. You're building a bespoke protective shell for each of your memories. For a more exhaustive list, check out our complete guide to packing materials for moving house.
Wrapping Techniques for Different Frame Types
Right, now that you’ve got your packing station sorted, we can get to the heart of the matter: wrapping the frames themselves. It’s tempting to just use a one-size-fits-all approach, but that’s where things go wrong. A sleek, modern frame with a glass front needs a completely different touch than a delicate, ornate antique. Getting this right is the secret to everything arriving in one piece.
Don’t just throw them in a box. A heavy wooden frame, for instance, needs far more cushioning than a light metal one. It’s these small details that make a huge difference and ensure your pictures arrive at your new home looking as good as they did when they left.
This simple diagram breaks down the essential components you'll need, no matter what kind of frame you're dealing with.
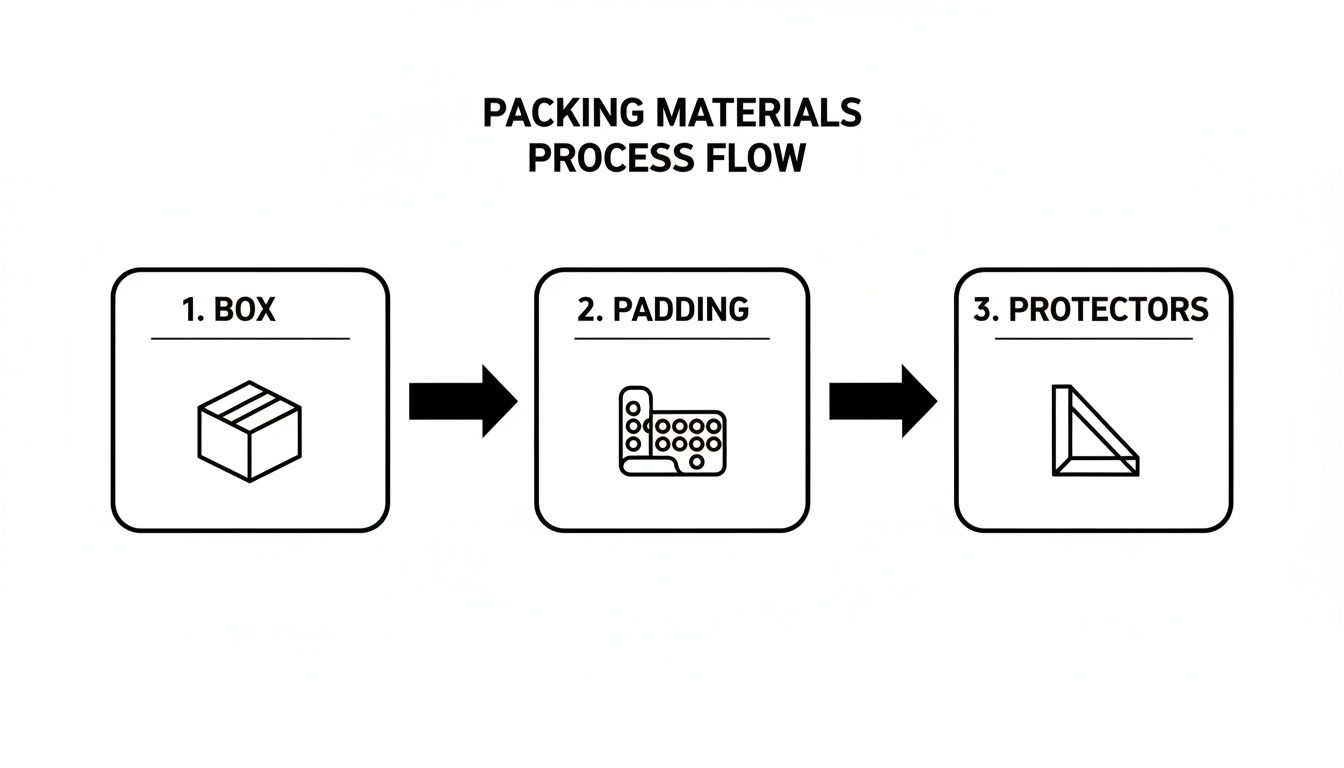
As you can see, a sturdy box, plenty of padding, and solid corner protectors are the foundation for packing any frame safely.
Handling Standard Glass-Fronted Frames
Most of your frames will probably have a glass front, and the biggest worry here is pretty obvious: shattered glass. A broken pane won't just ruin the frame; it can easily slash the photo or artwork behind it.
To prevent this, we use the 'X-tape' method. Grab some masking tape (painter's tape is ideal as it comes off cleanly) and stick it directly onto the glass in a big 'X' from corner to corner. If you're dealing with a larger frame, add a few more strips to make a star or grid pattern. This little trick won't magically stop the glass from cracking under a heavy blow, but it will hold the broken pieces together, stopping them from flying around and shredding your picture.
Always put the 'X' of tape on the glass before you do any other wrapping. It’s a two-minute job that provides an incredible amount of protection and peace of mind.
Protecting Ornate and Antique Frames
Ornate and antique frames are a different beast entirely. They’re often incredibly fragile, with intricate carvings, plaster details, or gilded surfaces that can chip or snap off at the slightest knock. These need a bit of extra care.
Start by gently wrapping the entire frame in a layer of acid-free tissue paper. Next, focus on those delicate details. Take small, folded bits of bubble wrap or soft packing foam and build up extra padding around any raised carvings, corners, or decorative elements. Use a tiny bit of tape to hold these pads in place, making sure the tape only touches the padding, not the frame’s surface. Finally, wrap the whole thing in at least two full layers of bubble wrap.
For these valuable pieces, cardboard corner protectors are an absolute must. They add a rigid, protective shell to the most vulnerable points.
Securing Frameless and Clip Frames
Modern frameless or clip-style frames pose their own unique challenge. You don't have to worry about ornate corners, but their exposed glass or acrylic edges are incredibly easy to chip. Just one small knock can send a crack spreading across the whole surface.
The best way to handle these is to create a protective "sandwich".
- First, wrap the frame in soft tissue paper or a thin sheet of packing foam.
- Next, cut two pieces of sturdy cardboard so they're slightly larger than the frame.
- Place your wrapped frame between these two cardboard sheets.
- Tape the cardboard sandwich shut securely around all the edges.
- For good measure, wrap the entire package in bubble wrap for one last layer of cushioning.
This method creates a tough outer shell that prevents anything from directly hitting those fragile edges. This isn't just a DIY tip; it's standard practice for professionals. For example, at SimplyPro Removal & Storage Ltd, our 22 years of experience in Bristol and Bath have taught us this works. By using quality bubble wrap and corner protectors for the 5,000+ frames we've packed, we’ve maintained a 99.7% damage-free rate—miles ahead of the typical DIY move.
Many of these techniques overlap with how you'd pack other fragile belongings. If you're also figuring out how to move glassware or TVs, you’ll find our guide on safely packing fragile items really helpful. By adapting your wrapping strategy to the item, you can confidently get every type of frame in your collection moved without a scratch.
Getting Your Frames Boxed Up and Labelled Correctly
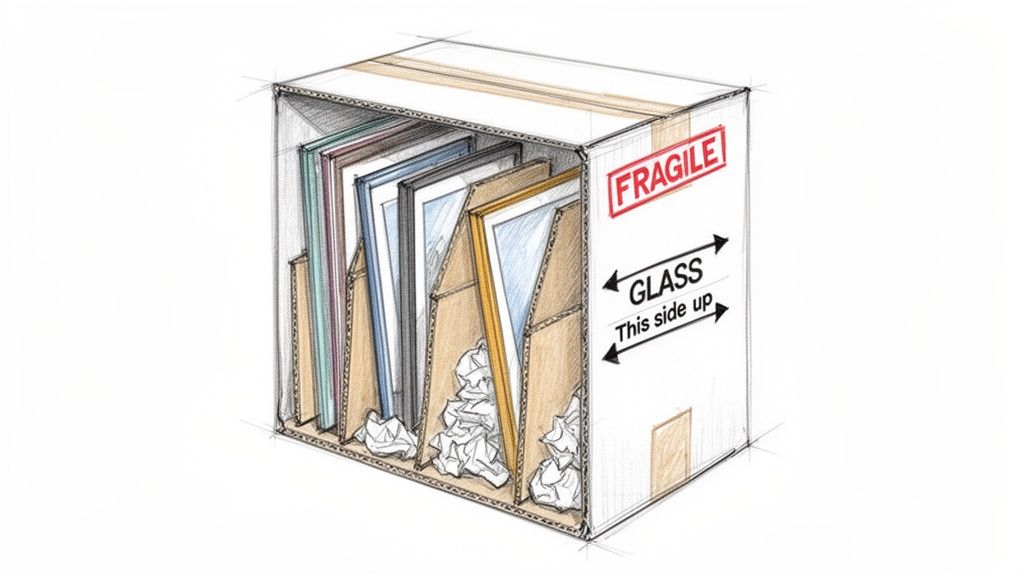
Now that you've wrapped each frame individually, the next stage is just as critical for getting them to their destination in one piece. The way you arrange them inside the moving box can be the difference between a pristine collection and a heartbreaking mess of broken glass and splintered wood. It's all about creating a snug, secure environment where nothing can shift or get crushed.
The single biggest mistake I see people make is laying frames flat on top of each other. This puts all the weight and pressure directly onto the glass of the frame at the bottom of the pile. One good jolt from a pothole in the road could be all it takes to cause a crack.
The Vertical Stacking Method
The secret that professional movers use is to stack frames vertically, almost like you’re filing records or slotting books onto a shelf. You should place each wrapped frame into the box on its side. This simple change transfers the weight to the strongest part of the frame—the edge—rather than focusing all that pressure on the fragile glass.
A few tips for getting this right:
- Group by Size: It really helps to keep frames of a similar size together. This creates a much more stable and even stack inside the box.
- Go Back-to-Back: Arrange them so the fronts face each other and the backs face each other. This simple trick stops the hanging hardware on the back of one frame from gouging the front of another.
- Add Dividers: For that extra bit of security, just slide a flat piece of cardboard between each frame. It acts as a fantastic buffer against any knocks or friction.
This technique is especially vital for businesses. For companies in Bath's creative sector, for instance, our packaging shop supplies acid-free materials that prevent 40% of yellowing issues over five years, ensuring frames from office displays arrive looking perfect. This expertise also minimises stress for homeowners and renters, who face an average of £250 in claims for damaged frames each year, making professional services a smart choice.
Key Takeaway: Never lay frames flat in a box. Always stack them on their sides, like files in a cabinet. This takes the pressure off the glass and dramatically reduces the risk of damage during the move.
Eliminate Any Empty Space
Empty space inside a box is your enemy. It gives your carefully packed frames room to slide around, bump into one another, and even topple over. Your goal is to make sure nothing can move, even if the box gets tilted or shaken about.
Fill every single gap with crumpled packing paper, bubble wrap, or even soft linens and towels. You want to pack it in firmly enough to create a snug fit, but not so tight that you're putting a squeeze on the frames themselves. A good test is to seal the box and give it a gentle shake – you shouldn't hear or feel a thing shifting inside.
Labelling: Be Loud and Clear
Your final job is to label the box properly. This isn't just to remind you what's inside; it's to tell everyone who handles it that this box needs special treatment.
Grab a thick marker pen and write on at least two sides of the box:
- "FRAGILE – GLASS" in big, bold letters.
- "THIS WAY UP" with clear arrows pointing to the top.
- The destination room (like "Living Room" or "Office") to save you a headache when unpacking.
If you want to make your labels really stand out, you could even look into using printable sticker paper to create notices that are impossible to miss. When everyone involved in the move knows to treat that box with extra care, your precious memories have a much better chance of arriving safely.
Safe Loading and Transport Strategies
You've done the hard part – every frame is wrapped, boxed up, and clearly labelled. But don't relax just yet. Getting them safely from point A to point B is where all that careful preparation pays off, and how you load the moving van is just as important as how you packed the boxes.
The two things to keep in mind are stability and cushioning. Your boxes of frames should never be the first items into an empty van. You need to build a solid base first with heavy, sturdy furniture like a chest of drawers or even boxes of books. This gives you a solid foundation that isn't going to shift and slide around corners.
Finding the Safest Spot in the Vehicle
With a secure base in place, you can start loading the more delicate items. Professional movers are masters at creating tiers, distributing weight evenly. Your frame boxes need to be slotted into a protected zone, wedged snugly between items that are soft but firm. It’s all about creating a little cocoon for them.
Some of the best spots I've found over the years are:
- Between a mattress and the van wall. A mattress is basically a giant, full-length shock absorber. It’s perfect for cushioning your frames against the inevitable bumps in the road.
- Tucked between sofa cushions. The space behind the back cushions of a sofa can be an surprisingly secure nook for smaller boxes.
- On top of a flat, stable surface. You can place them on a solid piece of furniture, but only if there's zero chance of them toppling over.
No matter where you place them, always load your frame boxes so they stand vertically on their edges. Never lay them flat. Laying them horizontally puts all the transit pressure directly onto the glass, which is a recipe for disaster.
A classic mistake people make when moving themselves is leaving fragile boxes with too much wiggle room. A sudden brake can send an unsecured box flying. Make sure every box of frames is packed in so tightly it can’t move forwards, backwards, or side-to-side.
Securing the Load for the Journey
Even in what looks like a tightly packed van, things can and will shift. The aim is to eliminate that movement completely.
Make sure your boxes are always on a level surface, not tilted at an awkward angle. If you're just using your car, the footwell behind the front seats is often a great spot. You can wedge the box in with soft bags or blankets to stop it from sliding around.
Before you pull away, give the boxes a final nudge. Do they wobble or shift? If so, you need to add more padding or rearrange the surrounding items until they're completely firm. Taking a minute for this final check is what ensures your precious memories arrive in one piece.
Knowing When to Call in the Professionals
While you can certainly pack most standard photo frames yourself, there are times when calling in an expert is simply the smartest, safest option. It all comes down to balancing the cost against the potential risk, especially when you’re dealing with items that are either financially or sentimentally priceless.
Think about hiring a professional team if you have anything particularly valuable. This could be original artwork in a custom frame, an antique mirror, or a period frame with fragile, ornate plasterwork that could crumble at the slightest knock.
Heavy, oversized frames and large mirrors are another kettle of fish altogether. They need specialist know-how, the right equipment, and specific materials to be moved safely. And sometimes, it's just about the sheer volume—if you have a whole gallery wall to pack up, the time and physical effort involved can be completely overwhelming.
The Pro Packing Advantage
Bringing in a professional crew to handle your frames isn't just about getting the job done faster. You're paying for their experience. They know the tricks of the trade and use top-quality, industry-standard materials that you likely wouldn't have lying around the house.
Most importantly, their work is backed by comprehensive insurance. That means if the worst should happen, you have financial protection and genuine peace of mind.
Ultimately, it’s a decision about protecting your most irreplaceable possessions. The picture frame market in the UK is growing, and a big part of that is driven by how often we move. With UK households relocating an average of 8.3 times—and even more frequently in bustling rental markets like Bristol and Bath—the chances of something getting damaged add up over the years. You can find more on these market trends and their drivers in recent industry reports.
Hiring professional packers is an investment in certainty. You're paying to ensure your most precious memories are handled with the utmost care from your old home to your new one.
If the very idea of tackling your collection of frames is causing you stress, that’s a pretty clear sign it might be time to hand the job over to the experts. Feel free to explore our dedicated packing services for moving house to see how we can take the load off.
A Few Final Questions, Answered
Even with a solid plan, a few questions always seem to pop up when you're surrounded by bubble wrap and boxes. Based on our experience helping clients across Bristol and Bath, here are the answers to the queries we hear most often.
What If I Don’t Have Speciality Boxes?
No picture boxes? No problem. A good quality, double-walled moving box will do the job perfectly well. The trick is to pick one that’s just a bit taller than your biggest frame.
The most important thing is to completely fill any empty space around the frames with crumpled packing paper, old towels, or soft bedding. You're aiming for a snug fit where nothing can shift or slide around inside.
Can I Pack Multiple Frames in One Box?
You certainly can, provided you do it the right way. The best approach is to group frames of a similar size together. Stand them up vertically on their edges inside the box, a bit like files in a cabinet.
Here’s the pro tip: always slide a piece of cardboard between each wrapped frame. This simple divider stops the hooks and wires on one frame from gouging the one next to it.
Whatever you do, never lay frames flat on top of one another. The combined weight creates a huge amount of pressure on the glass at the bottom of the pile, and it’s almost guaranteed to crack.
Is It Safe to Leave Pictures Inside the Frames?
For the vast majority of photos and standard prints, leaving them in the frame is completely fine. In fact, the glass and backing board offer excellent protection during the move.
However, if you're dealing with a particularly valuable or fragile piece of artwork, it’s worth thinking about removing it. Transporting it separately in an artist's portfolio can give you that extra peace of mind.
Ready to hand over the packing to a team that does this every day? The experienced crew at SimplyPro Removal & Storage Ltd treats every fragile item with professional care, making sure your cherished memories get to your new home in one piece. Get your free, no-obligation quote today.